Dane.Kouttron
[01.10.22] Replicator 2 Revival
| Did you inherit a
crusty old maker-bot replicator 2 from a lab-clean out
and are frustrated with how finicky it is to reliably
print? Get things working again and bring the machine back to life, with some details below. |
| What? |
Hardware Repair | Conclusion | Image Directory |
| Project Background |
| What is a
replicator 2? The Rep 2 is a nearly 10 year old model printer at the time of this writing. Brand new this thing retailed for $2500 [1]. There were a few variants, a dual extruder model, and a heated bed model. The design became the state of the art for consumer-level printers and sparked a number of nearly direct clones. |
 Did you know you can literally buy a
2012 makerbot replicator clone in 2022? The Flashforge
creator [link] is very
close to being a modern duplicate, I believe the control
electronics and main board are different but the
mechanicals are so close that its hard not to notice.
There are some improvements that I really like,
namely replacing the membrane push buttons with tactile
push buttons. Even the cut-outs for the filament spool
holders are in the same spot. A colleague purchased one of
these and I used it for a few weeks, its surprisingly
good. Did you know you can literally buy a
2012 makerbot replicator clone in 2022? The Flashforge
creator [link] is very
close to being a modern duplicate, I believe the control
electronics and main board are different but the
mechanicals are so close that its hard not to notice.
There are some improvements that I really like,
namely replacing the membrane push buttons with tactile
push buttons. Even the cut-outs for the filament spool
holders are in the same spot. A colleague purchased one of
these and I used it for a few weeks, its surprisingly
good. |
| Keep in mind, at one
point the replicator 2 was a reasonable printer,
while there are a number of improvements, add-ons and
gadgets to augment it, lets focus on getting the stock
contraption running reliably. Its actually possible to
have a makerbot that prints and isn't miserable, some of
the keys to doing that are setting realistic expectations
and not using the godforsaken makerbot printer slicer.
Lets aim for a reliable 50mm/s print speed at 0.02mm layer
height and work from there. |
| Dane why are you
spending time waking up an old machine, you can
get a replicator clone for $300. I'm interested in printing out some parts using odd filaments and having a printer just for non-normal filaments lets you keep your useful printers working. Specifically some of the curious 'bronze' FDM filaments from the virtual-foundry folk are really interesting. Coupled with a tiny kiln and some associated hardware you can get some reasonable metal prints, which is incredibly exciting. Yes you can CNC parts but, weird elaborate shapes can get opened up with multi-material kiln-able prints |
| Step 0: Gather
tools, Determine what works & what doesn't work |
|
| You have a pile of
questionable hardware lets sort out what works and what
doesn't |
|
Make your
life easier, get an old SD card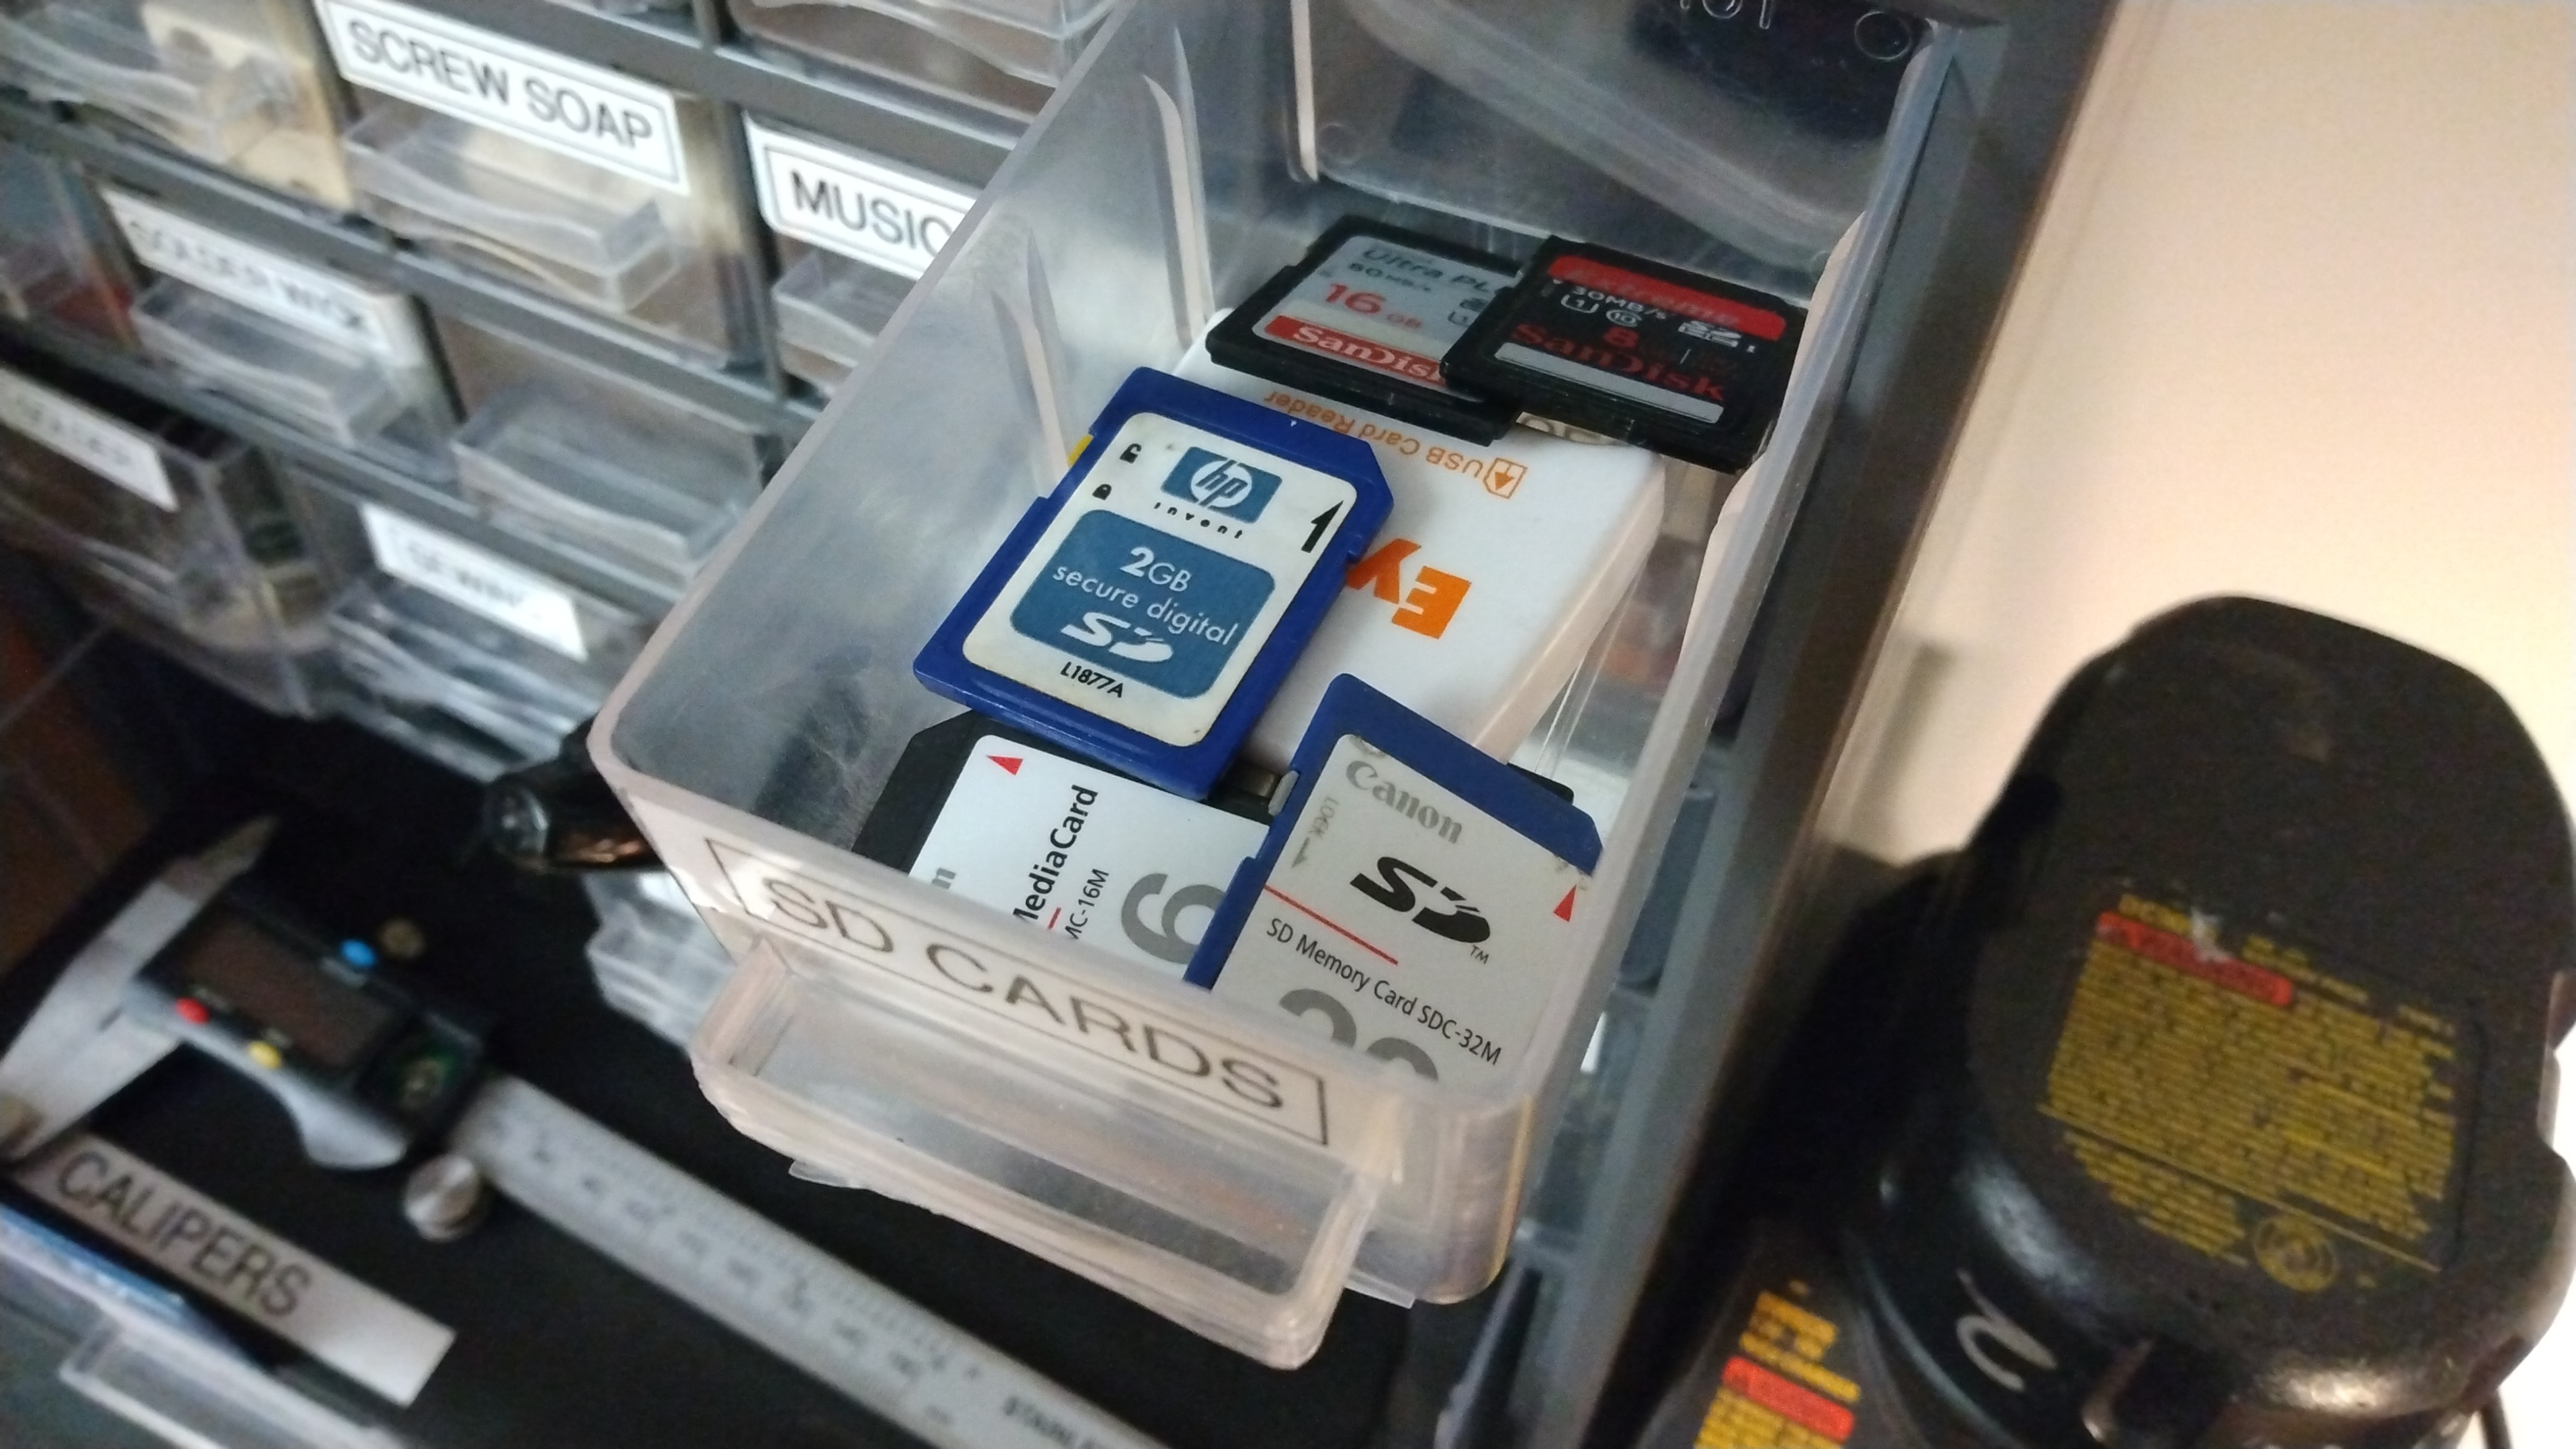 The Replicator 2's for whatever
reason work better with old 2GB SD cards. Check that old
derpy HP camera that ran on AA batteries, or that dubious
digital picture frame. Yes that one. You can even use old
MMC cards. We're going for simple 'almost reliable'
functionality to get there we're starting from first
principles. Do you know what the read-rate is for a 3d
printer? 2MB/hour, yes an old card will work totally fine.
For testing I'm using a 64MB MMC SD Card. The Replicator 2's for whatever
reason work better with old 2GB SD cards. Check that old
derpy HP camera that ran on AA batteries, or that dubious
digital picture frame. Yes that one. You can even use old
MMC cards. We're going for simple 'almost reliable'
functionality to get there we're starting from first
principles. Do you know what the read-rate is for a 3d
printer? 2MB/hour, yes an old card will work totally fine.
For testing I'm using a 64MB MMC SD Card. |
|
| 3D
Printer Maintenance kit for <40$ Interestingly most printers topologically have similar parts internally, so for maintenance there's a lot of crossover on tools, here's my goto kit:
|
|
Fixing
the push-buttons with conductive paint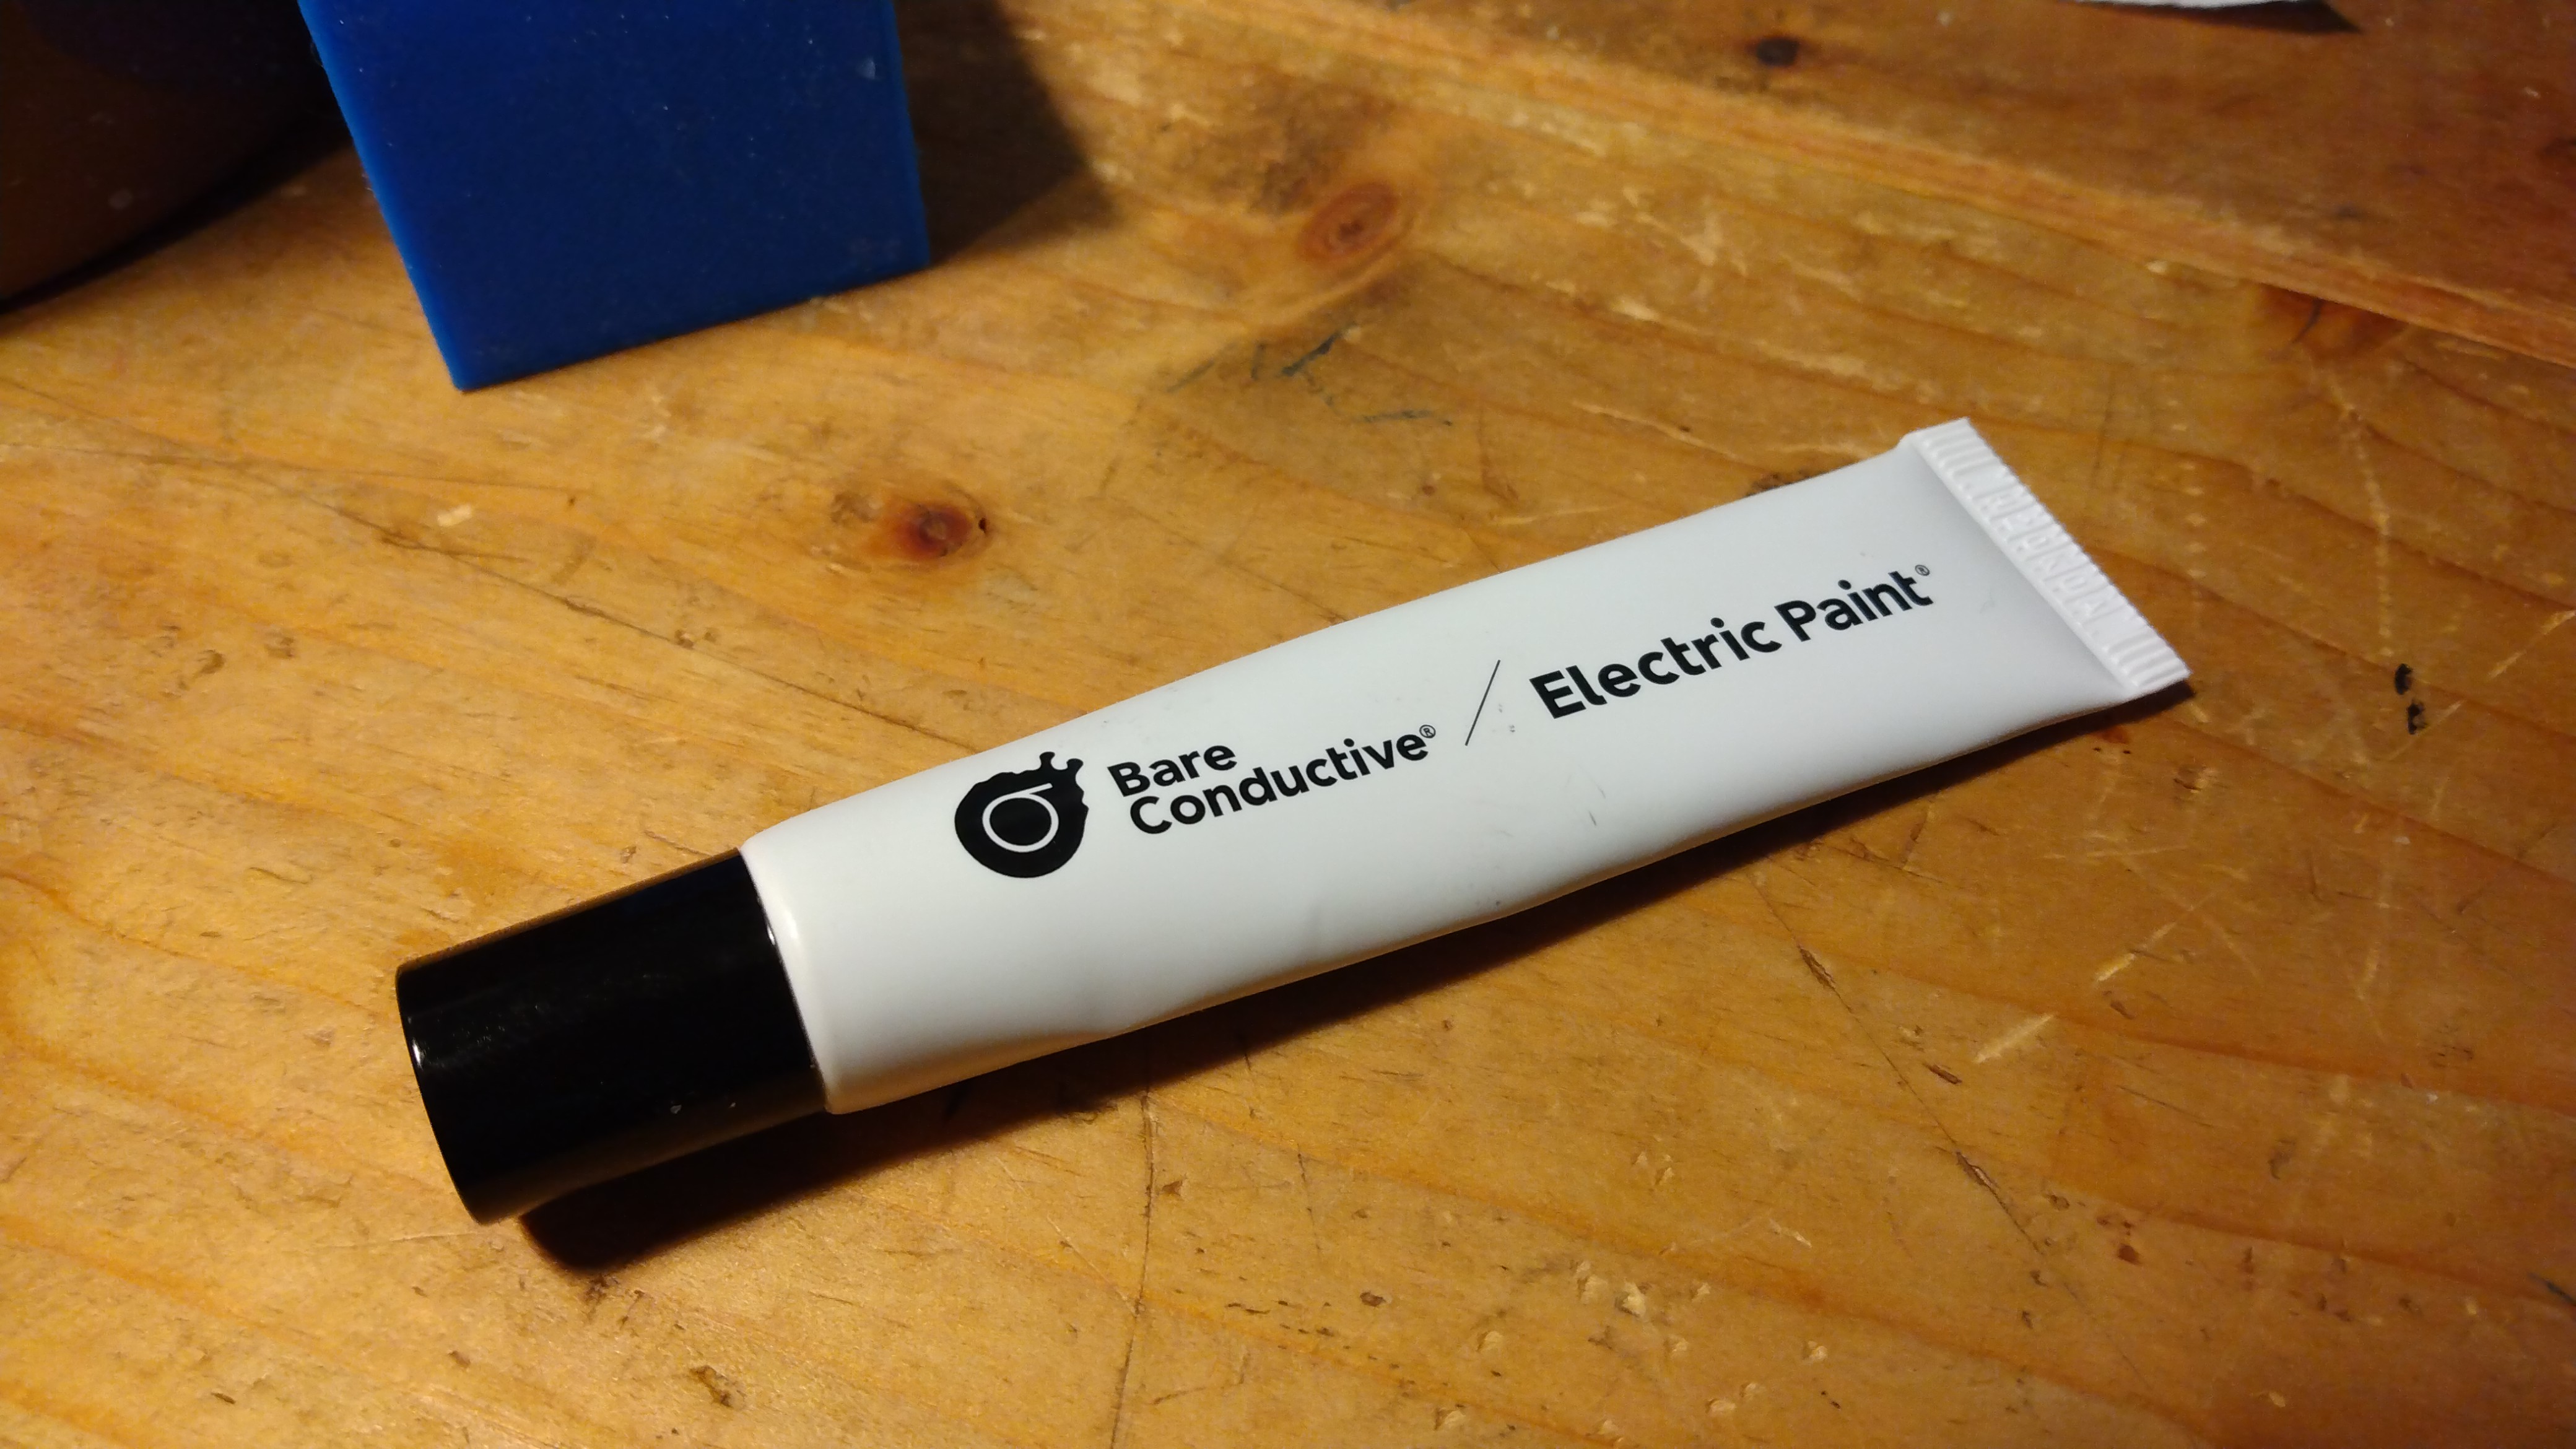 Its almost a guarantee that the front-panel push-button is showing its age. This is a membrane-style push-button where the rubbery bit has a conductive paint on the back and mushes against a PCB to simulate push-button actuation. The conductive paint wears down and the front panels become useless. I found this stuff [link] and it works phenomenally well. What does work really well is to fondle the canister before use, it somewhat helps the paint mix if it has separated. After fondling in a warm environment, set aside a dollop on a piece of paper, use a matchstick end to transfer some of the paint from the dollop to the membrane push-buttons. ` |
|
A look at
the push-button backside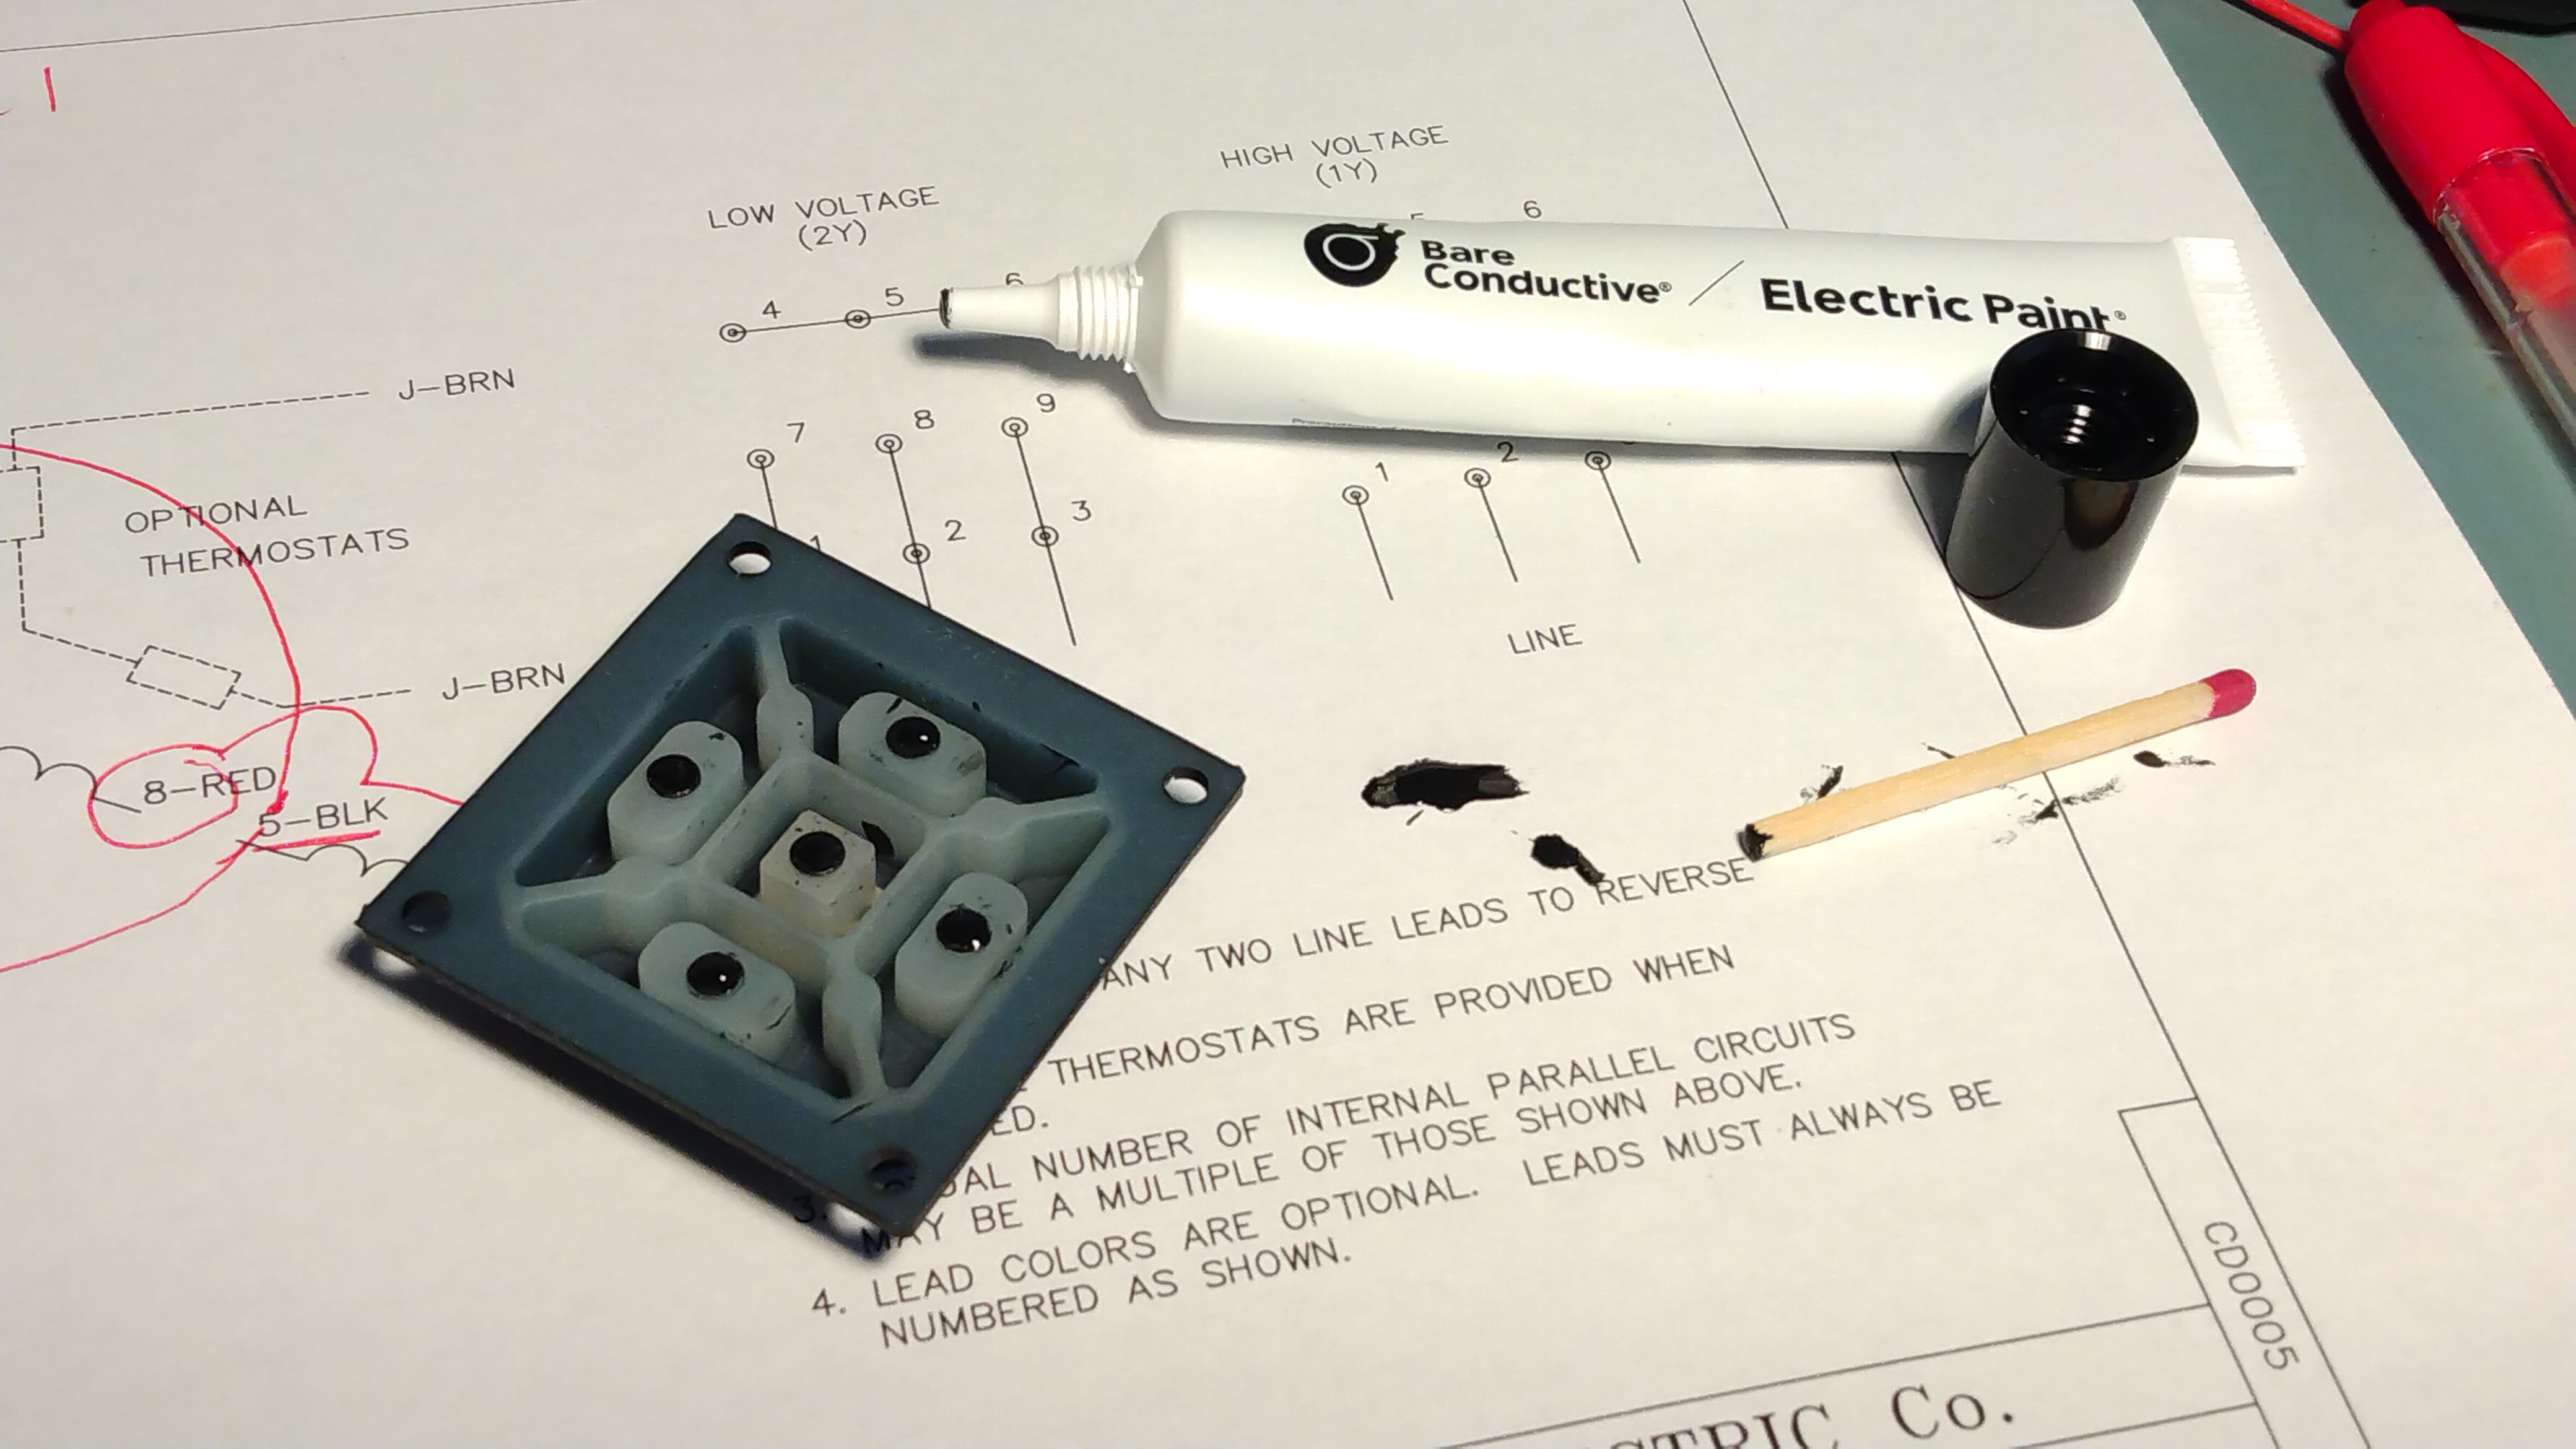 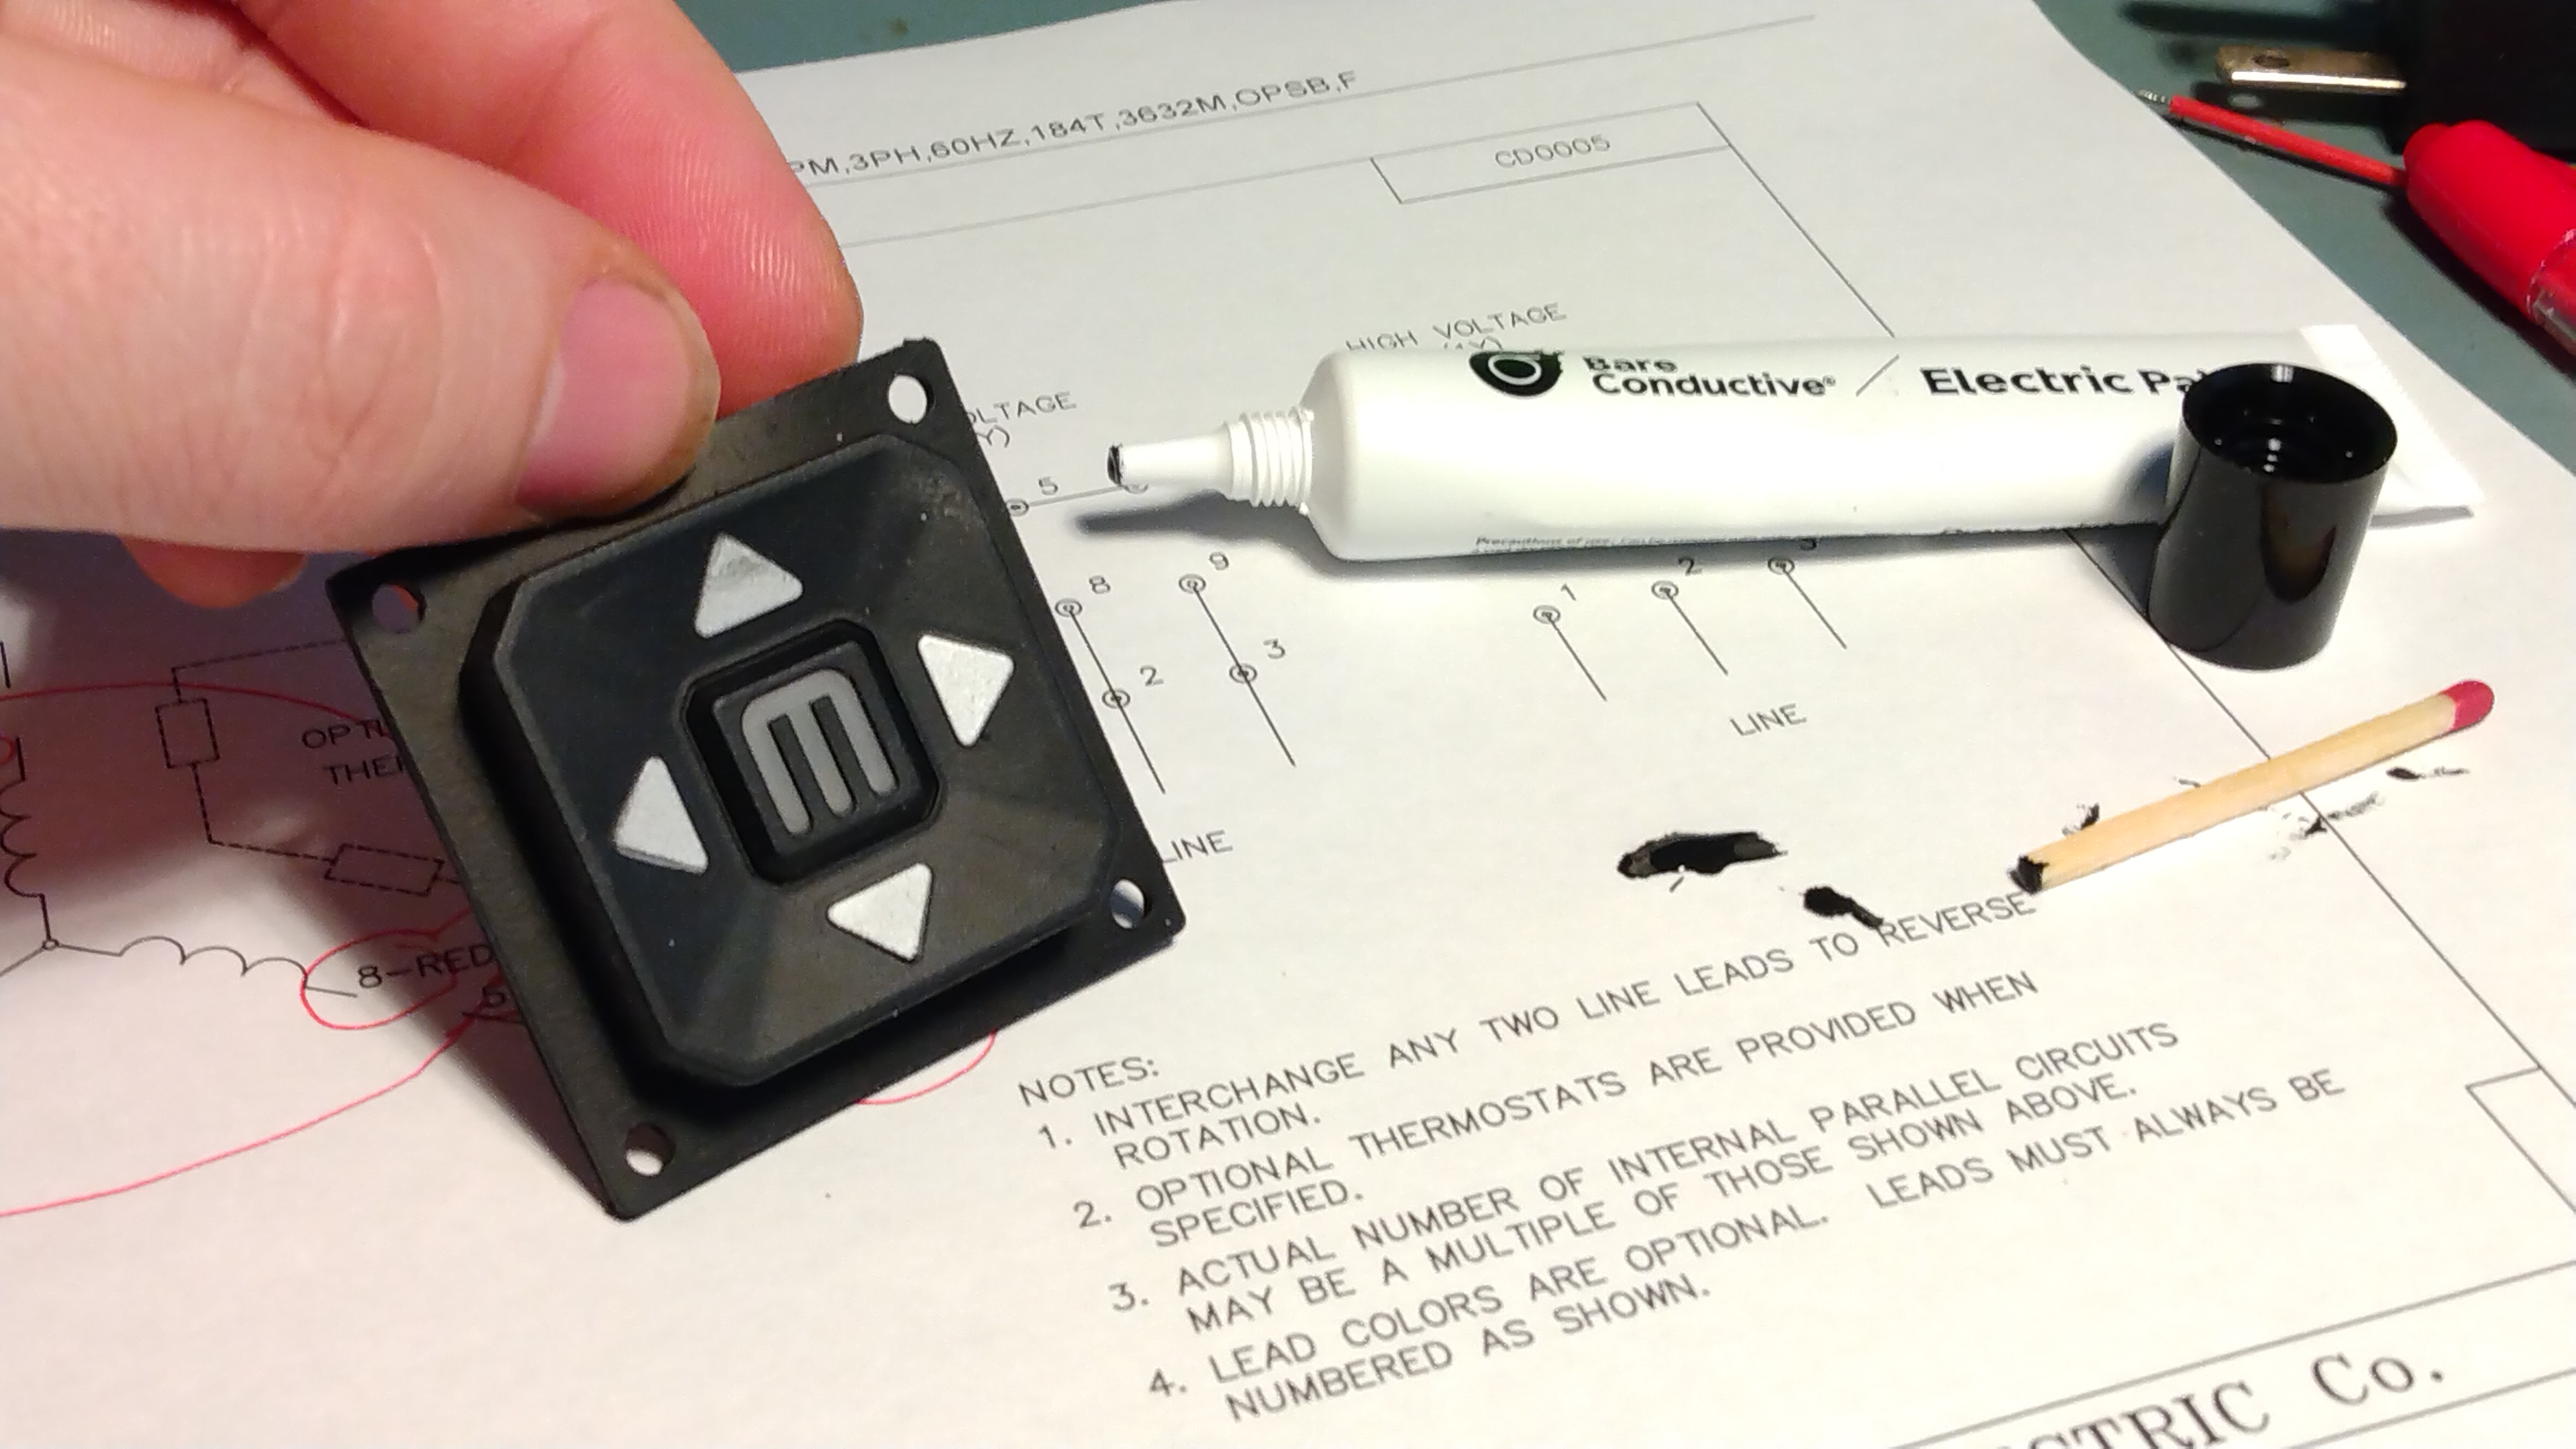 Here's the push-button membrane thing removed from the chassis, to remove it you can just squeeze it and pull it out, its only really held in by its geometry. You don't actually need a lot of conductive paint to cover the button pads and for whatever reason the back of a matchstick works really well for applying. They do recommend making multiple small coating |
|
A little
dab will do
I just wanted to be clear, you really do not need much conductive paint to fix these pads. The dry time lists ~45 minutes, but I found its reasonable to let it cure for 2+ hrs before installing. If you do get some of the paint outside of the circular area, just wait until dry and scrape it off. A small scalpel knife works well for this. |
|
Better
than conductive paint, actual push-buttons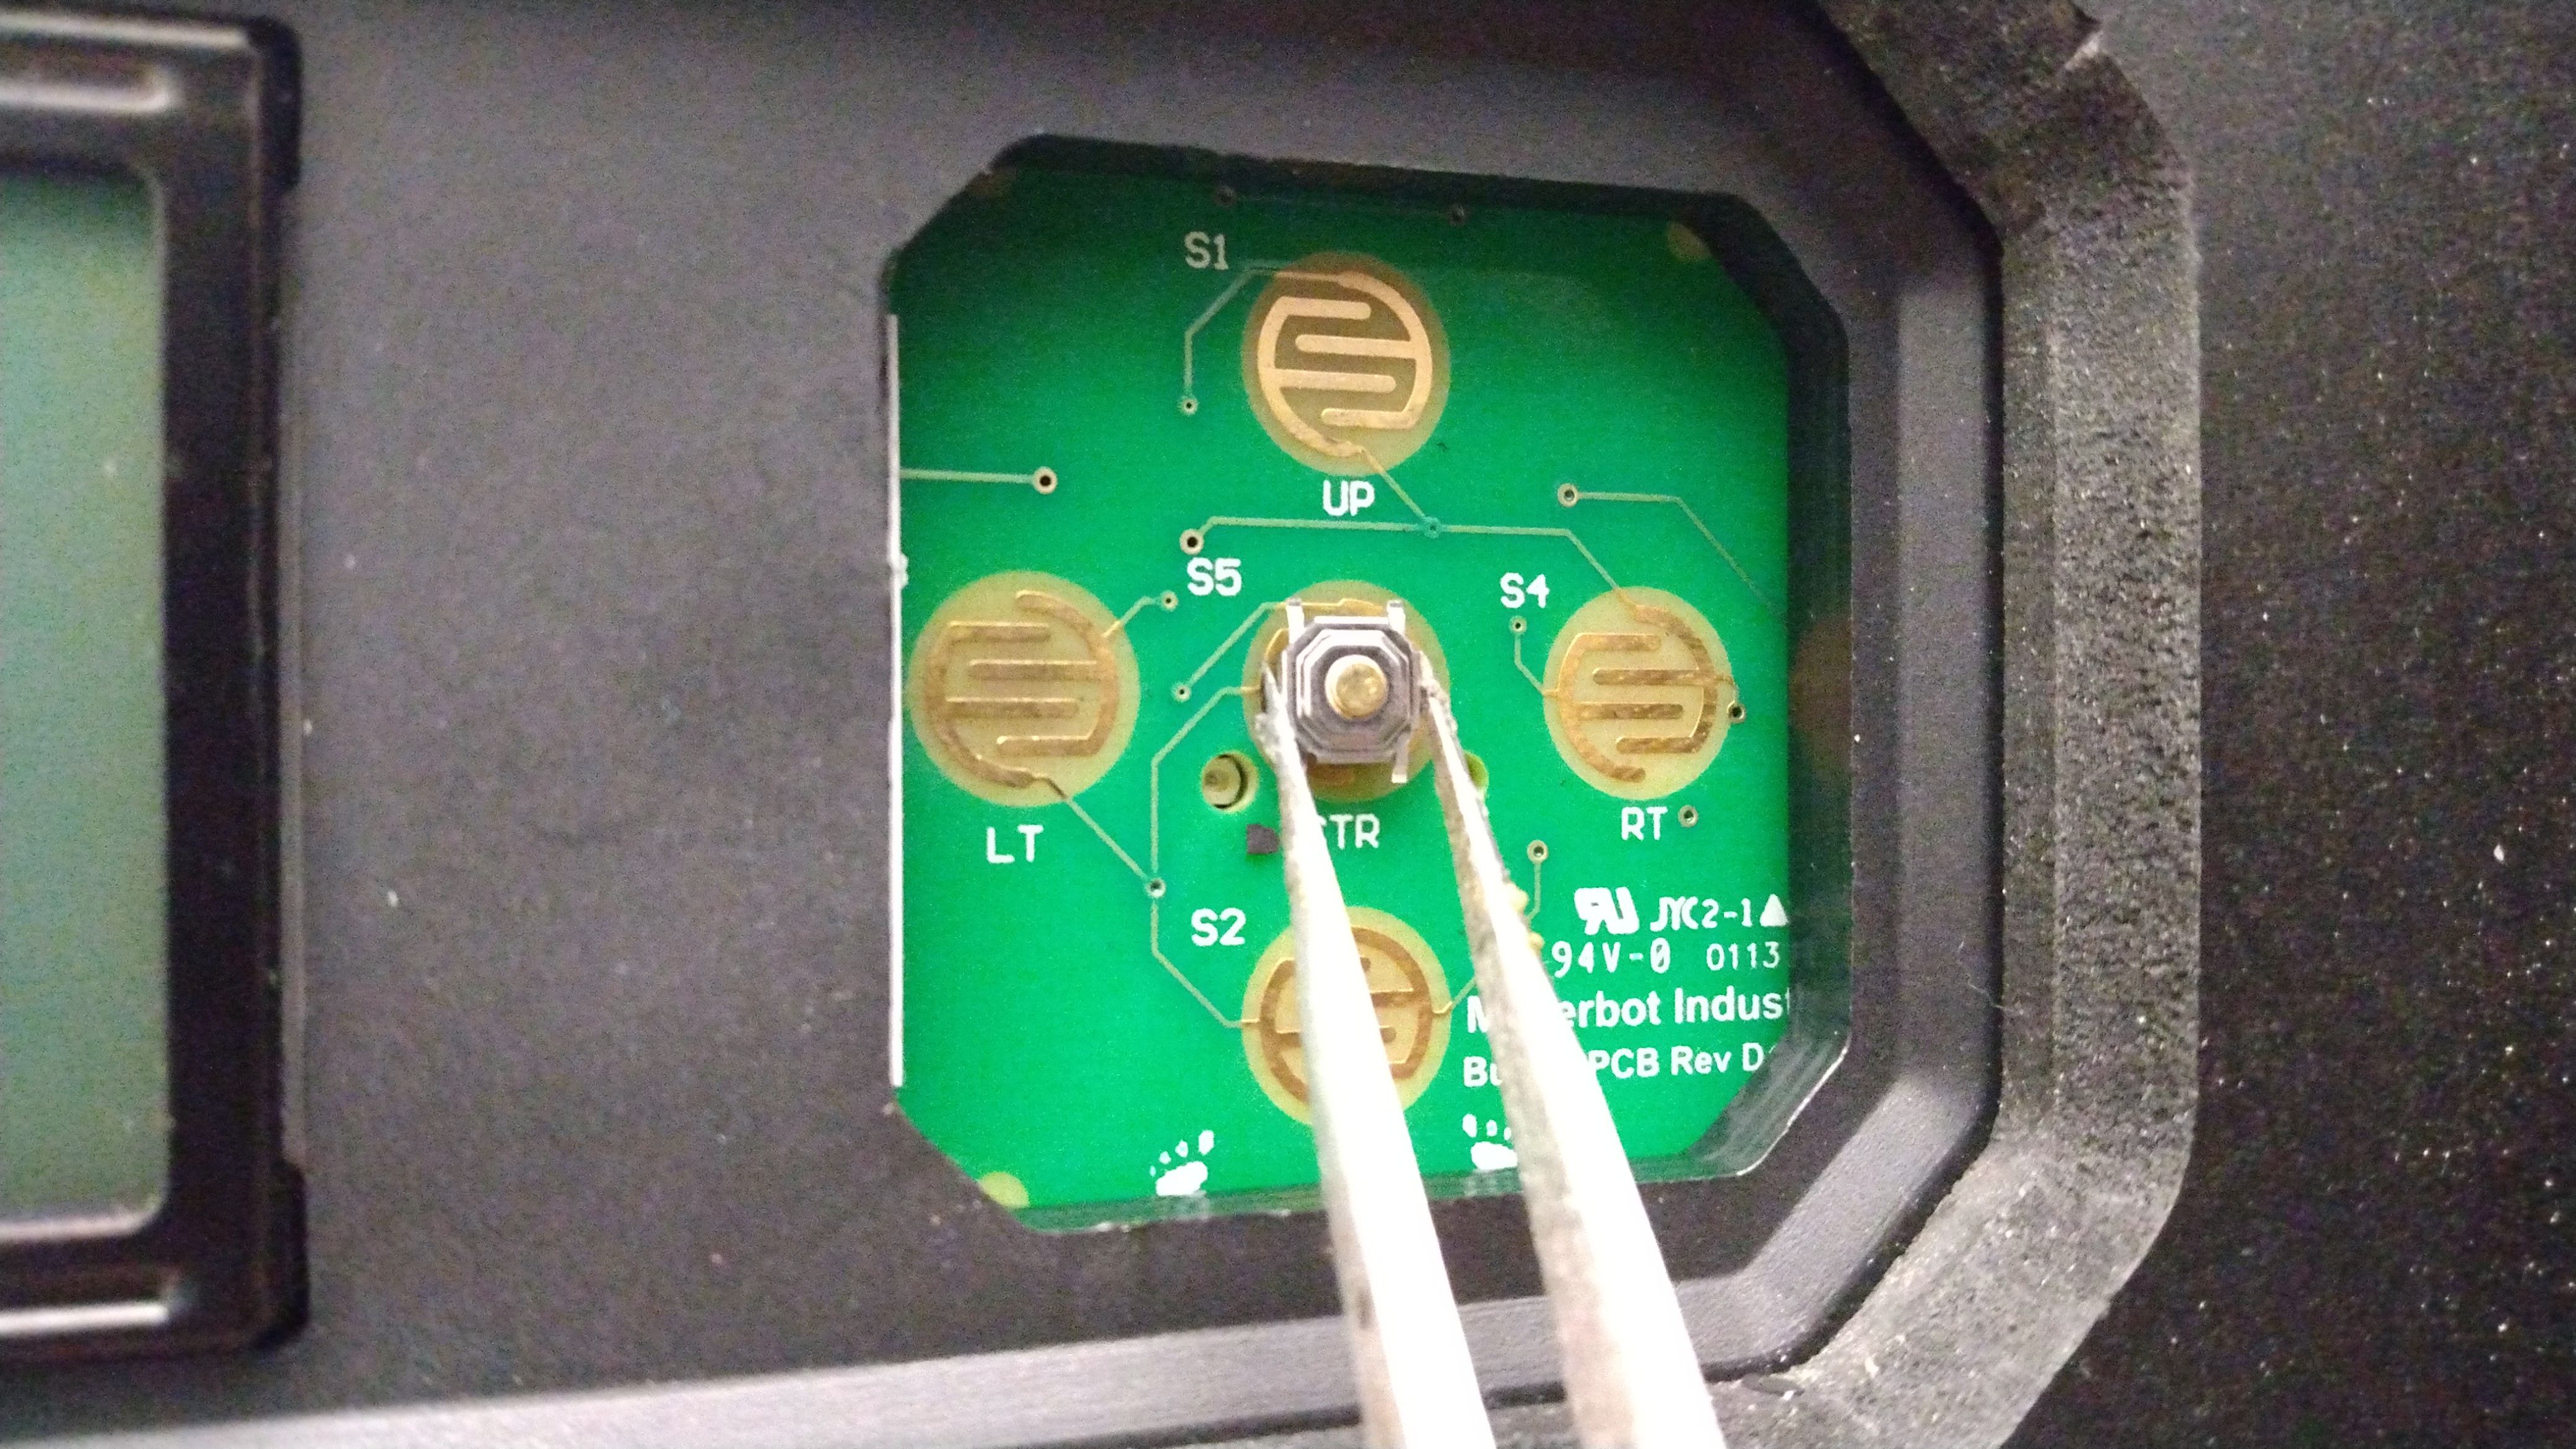 Conductive paint is great, but it is a wear item. You will likely re-paint those pads in a year or so. I was thinking 'wait there are small SMT buttons', so I found a relatively short height momentary push-button with the goal of soldering it on-board and having it sit in between the membrane thing and the board. Given that these are only 1.5mm tall this actually works reasonably well. |
|
Alternate-Alternate
Push-button fix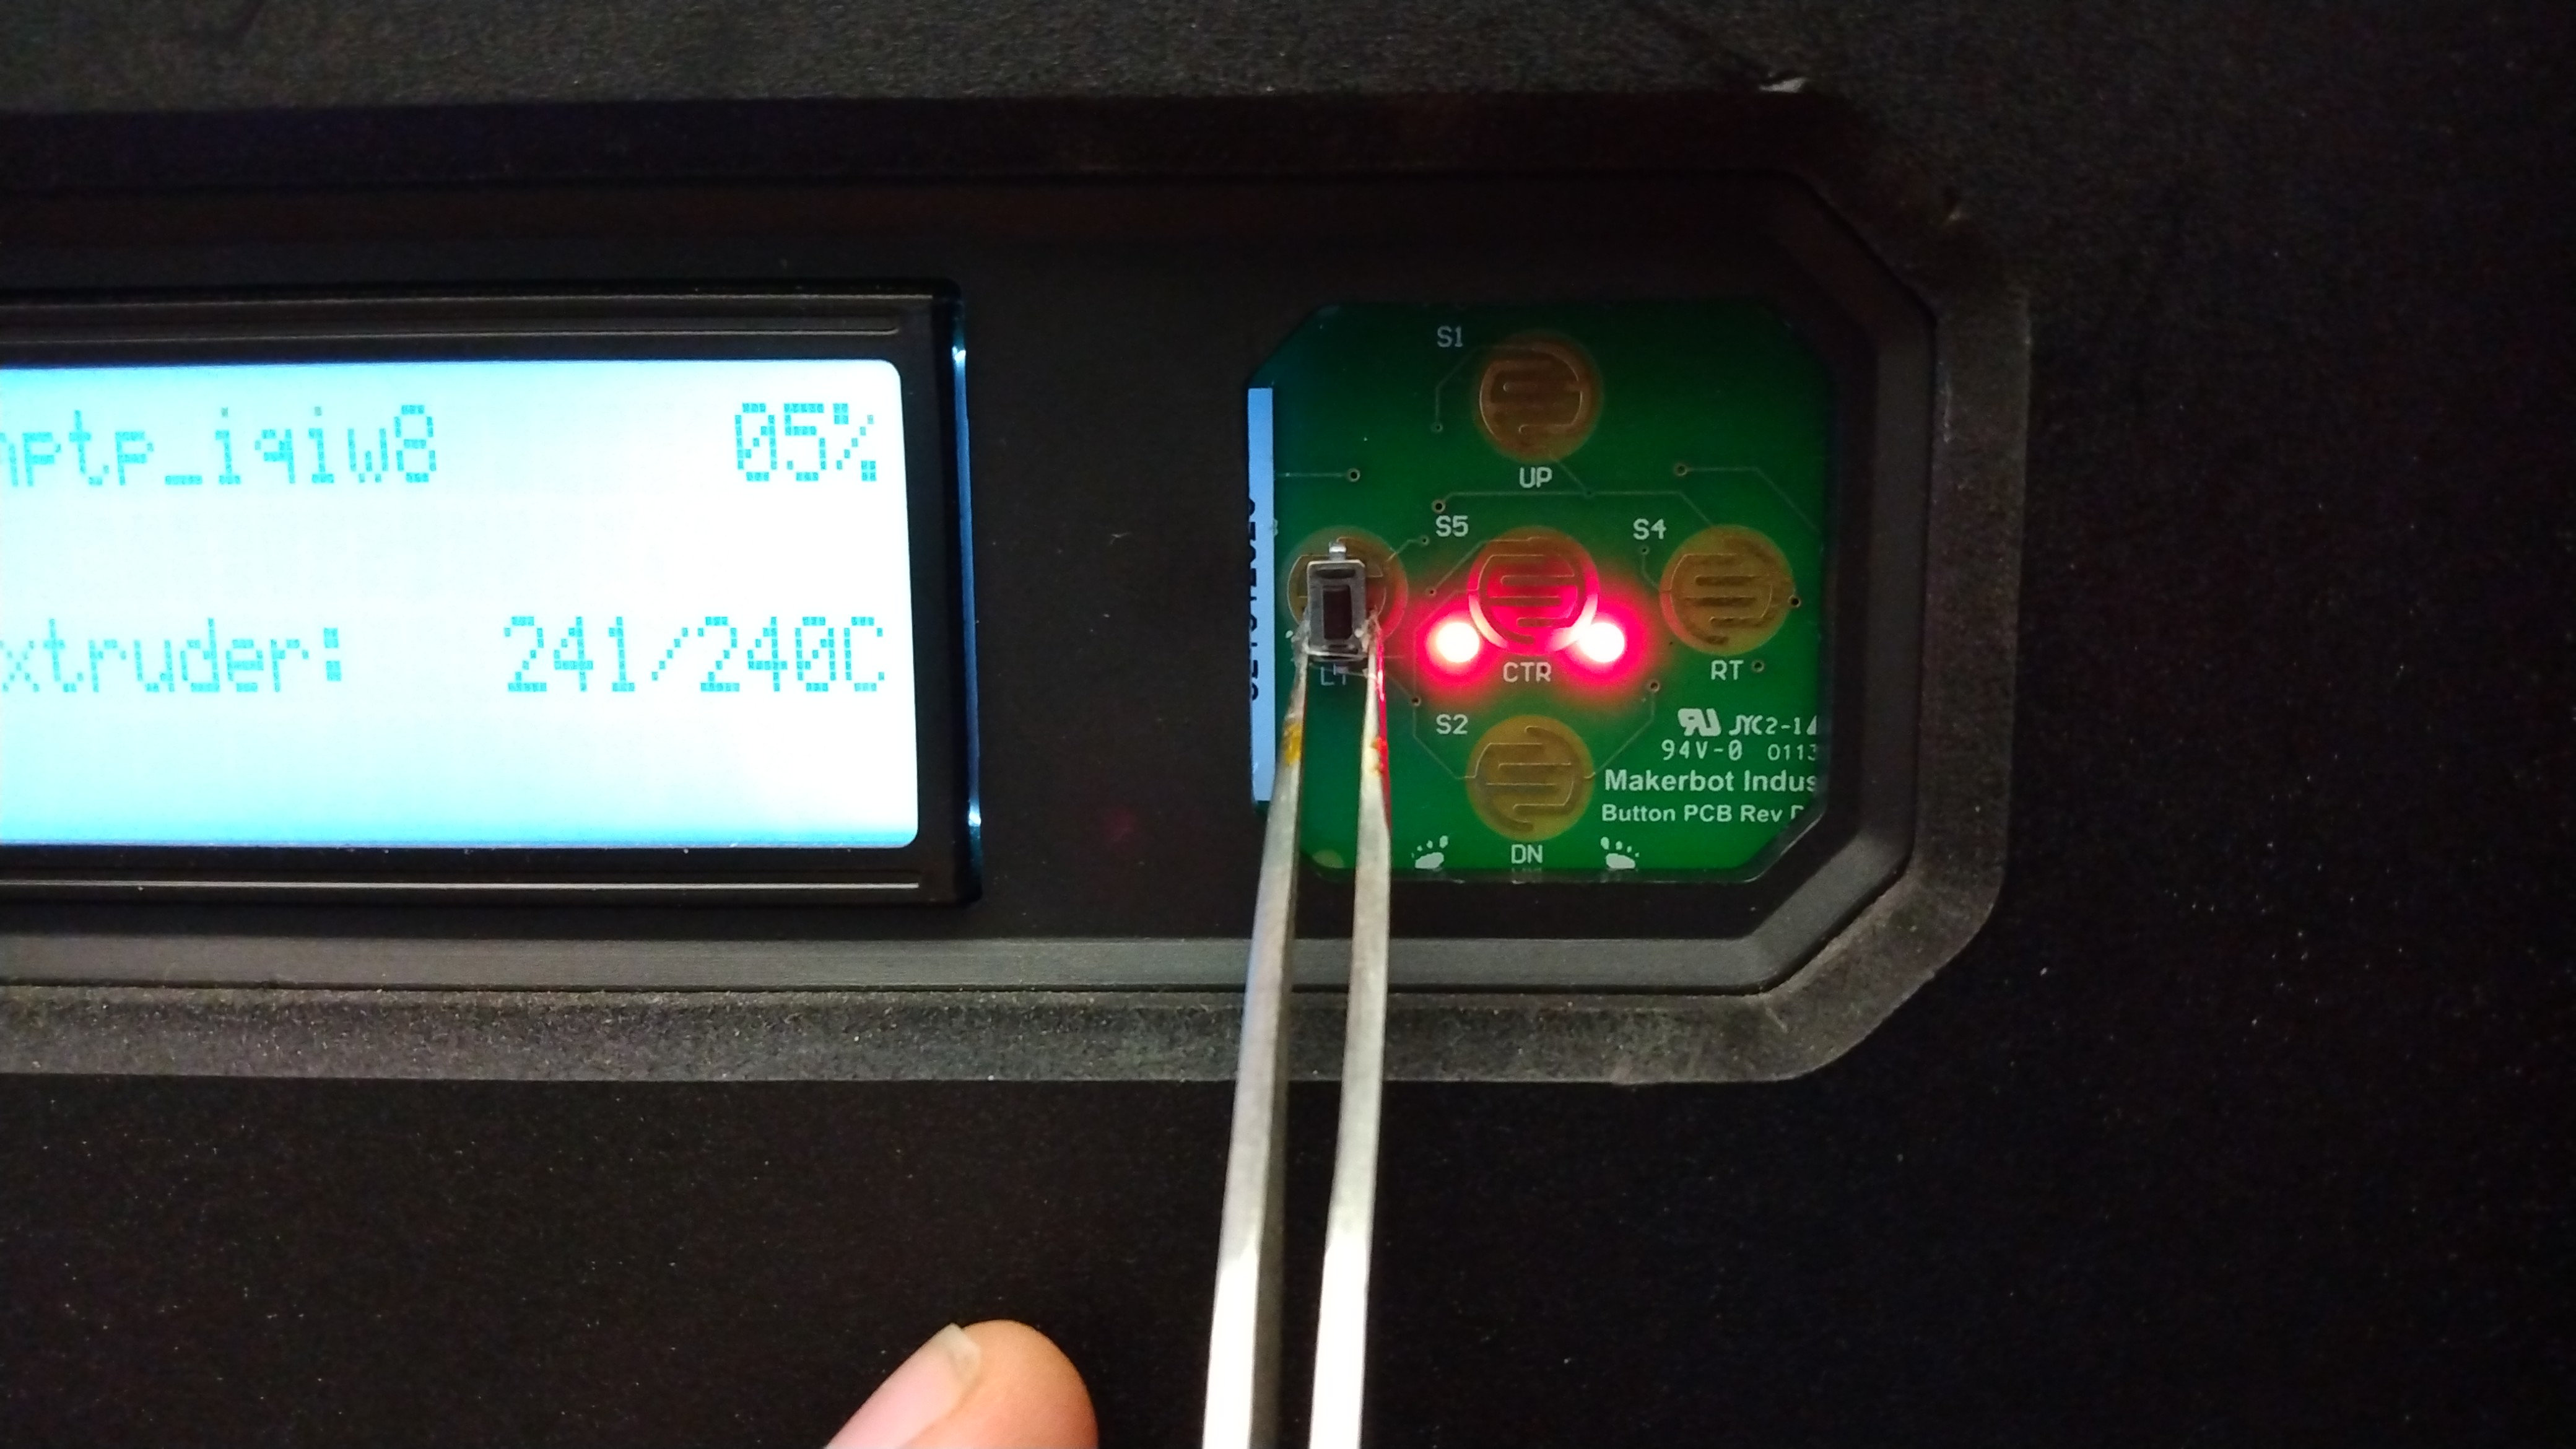 If your membrane push-button thing no longer exists, don't fret, somewhat larger adorable surface-mount push-buttons are a thing, these are incredibly small but do a reasonably good job at replacing the membrane thing completely. These particular surface mount push-buttons are from here [link] but the only important dimension is the pin spacing. These do have a bit of a tall 'stance' so try and provide enough solder for these to be supported structurally. |
|
| Getting
some basic baseline filament It is super tempting to grab the dusty 3/4 used up spool from 2 yrs ago, or some ABS you never got around to using, but we're trying to get some bench-marking here. I highly recommend the Dremel 1.75mm PLA. Its not anything particularly spectacular its just incredibly identical batch to batch and prints remarkably reliably. Its even available on mcmaster-carr for $30. All the benchmarking here is with their 1.75mm blue PLA. |
|
Is the
temperature sensor reporting real
temperature?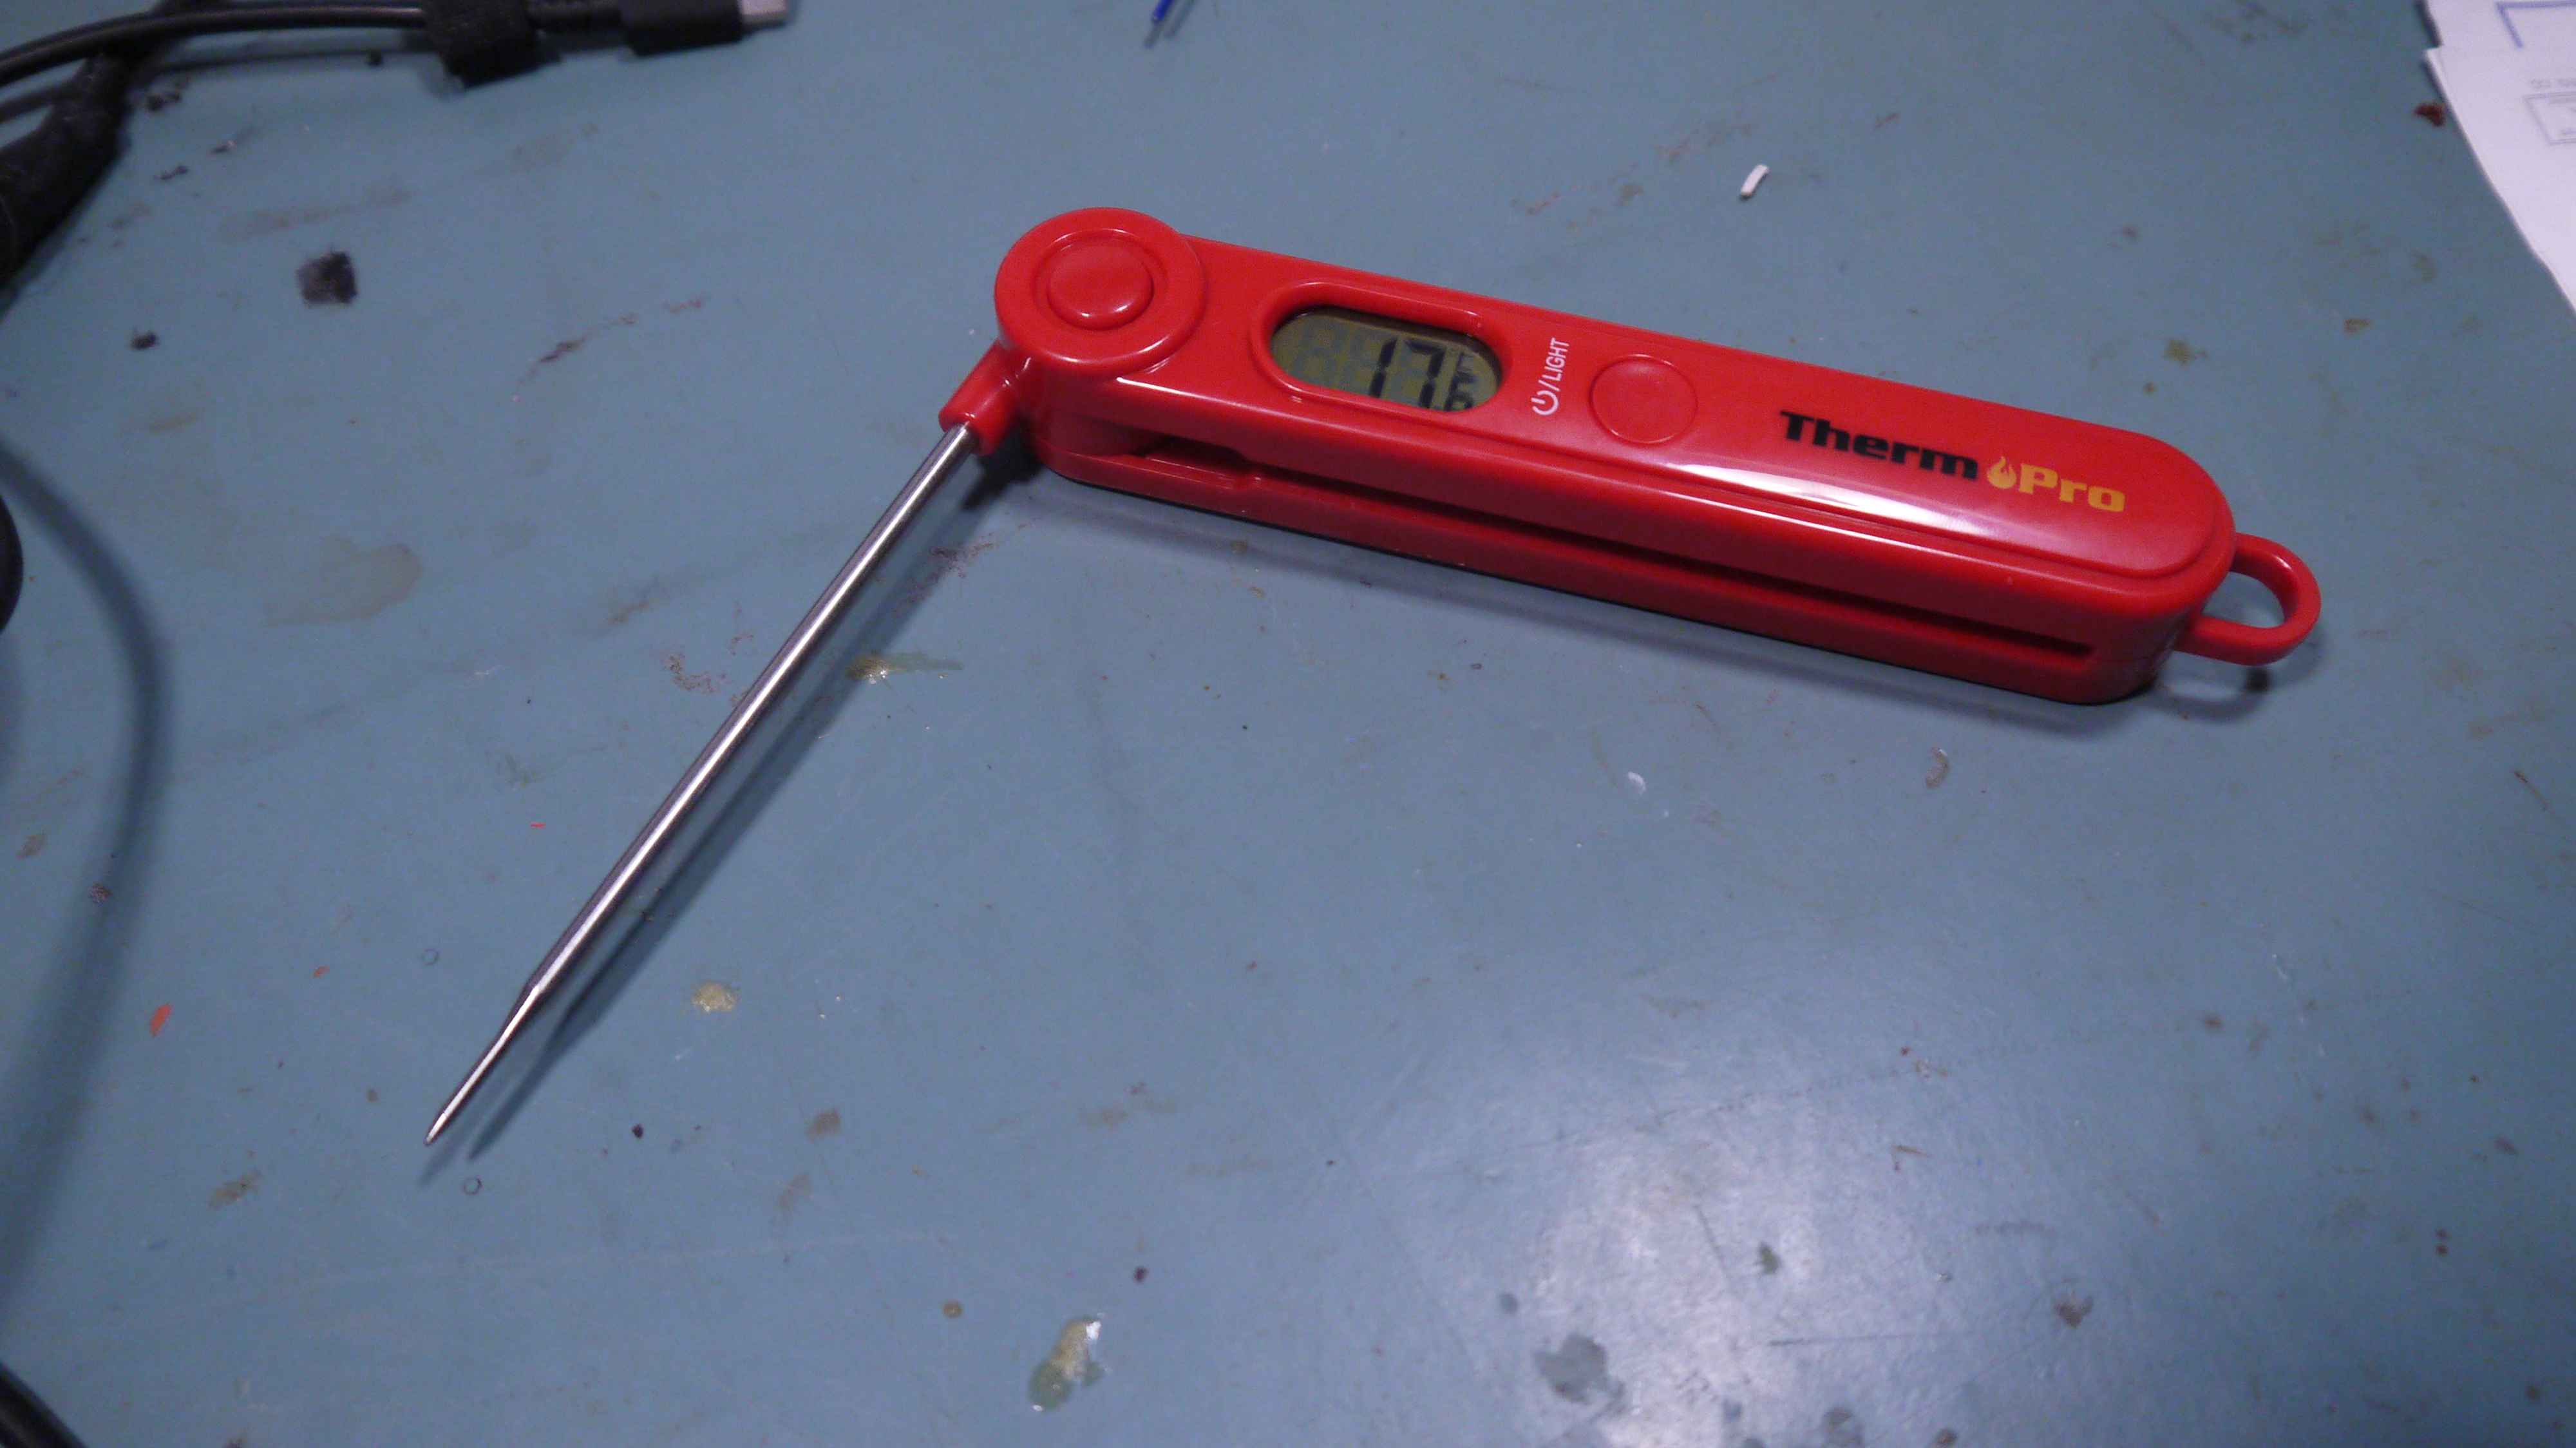 One issue I've observed was the
reported extruder temperature sensor and real life
do not match at all. They can be comically wrong. This is
a pretty big hurdle as plastic extrusion is incredibly
temperature dependent. Fortunately even off-brand
multi-meters feature thermocouple inputs, and in a pinch,
a digital meat thermometer does go to 300C. Actually, a
digital meat thermometer should be excellent at this, time
to add it to the '3d printer maintenance kit'. I wouldn't
use this to verify absolute temperature but '+/-5C' should
be reasonable. With the tip of the thermometer in the top
of a cup of boiling water it reads 99C, so its likely this
is reasonably accurate. One issue I've observed was the
reported extruder temperature sensor and real life
do not match at all. They can be comically wrong. This is
a pretty big hurdle as plastic extrusion is incredibly
temperature dependent. Fortunately even off-brand
multi-meters feature thermocouple inputs, and in a pinch,
a digital meat thermometer does go to 300C. Actually, a
digital meat thermometer should be excellent at this, time
to add it to the '3d printer maintenance kit'. I wouldn't
use this to verify absolute temperature but '+/-5C' should
be reasonable. With the tip of the thermometer in the top
of a cup of boiling water it reads 99C, so its likely this
is reasonably accurate. |
|
Yeah the
temperature is incredibly off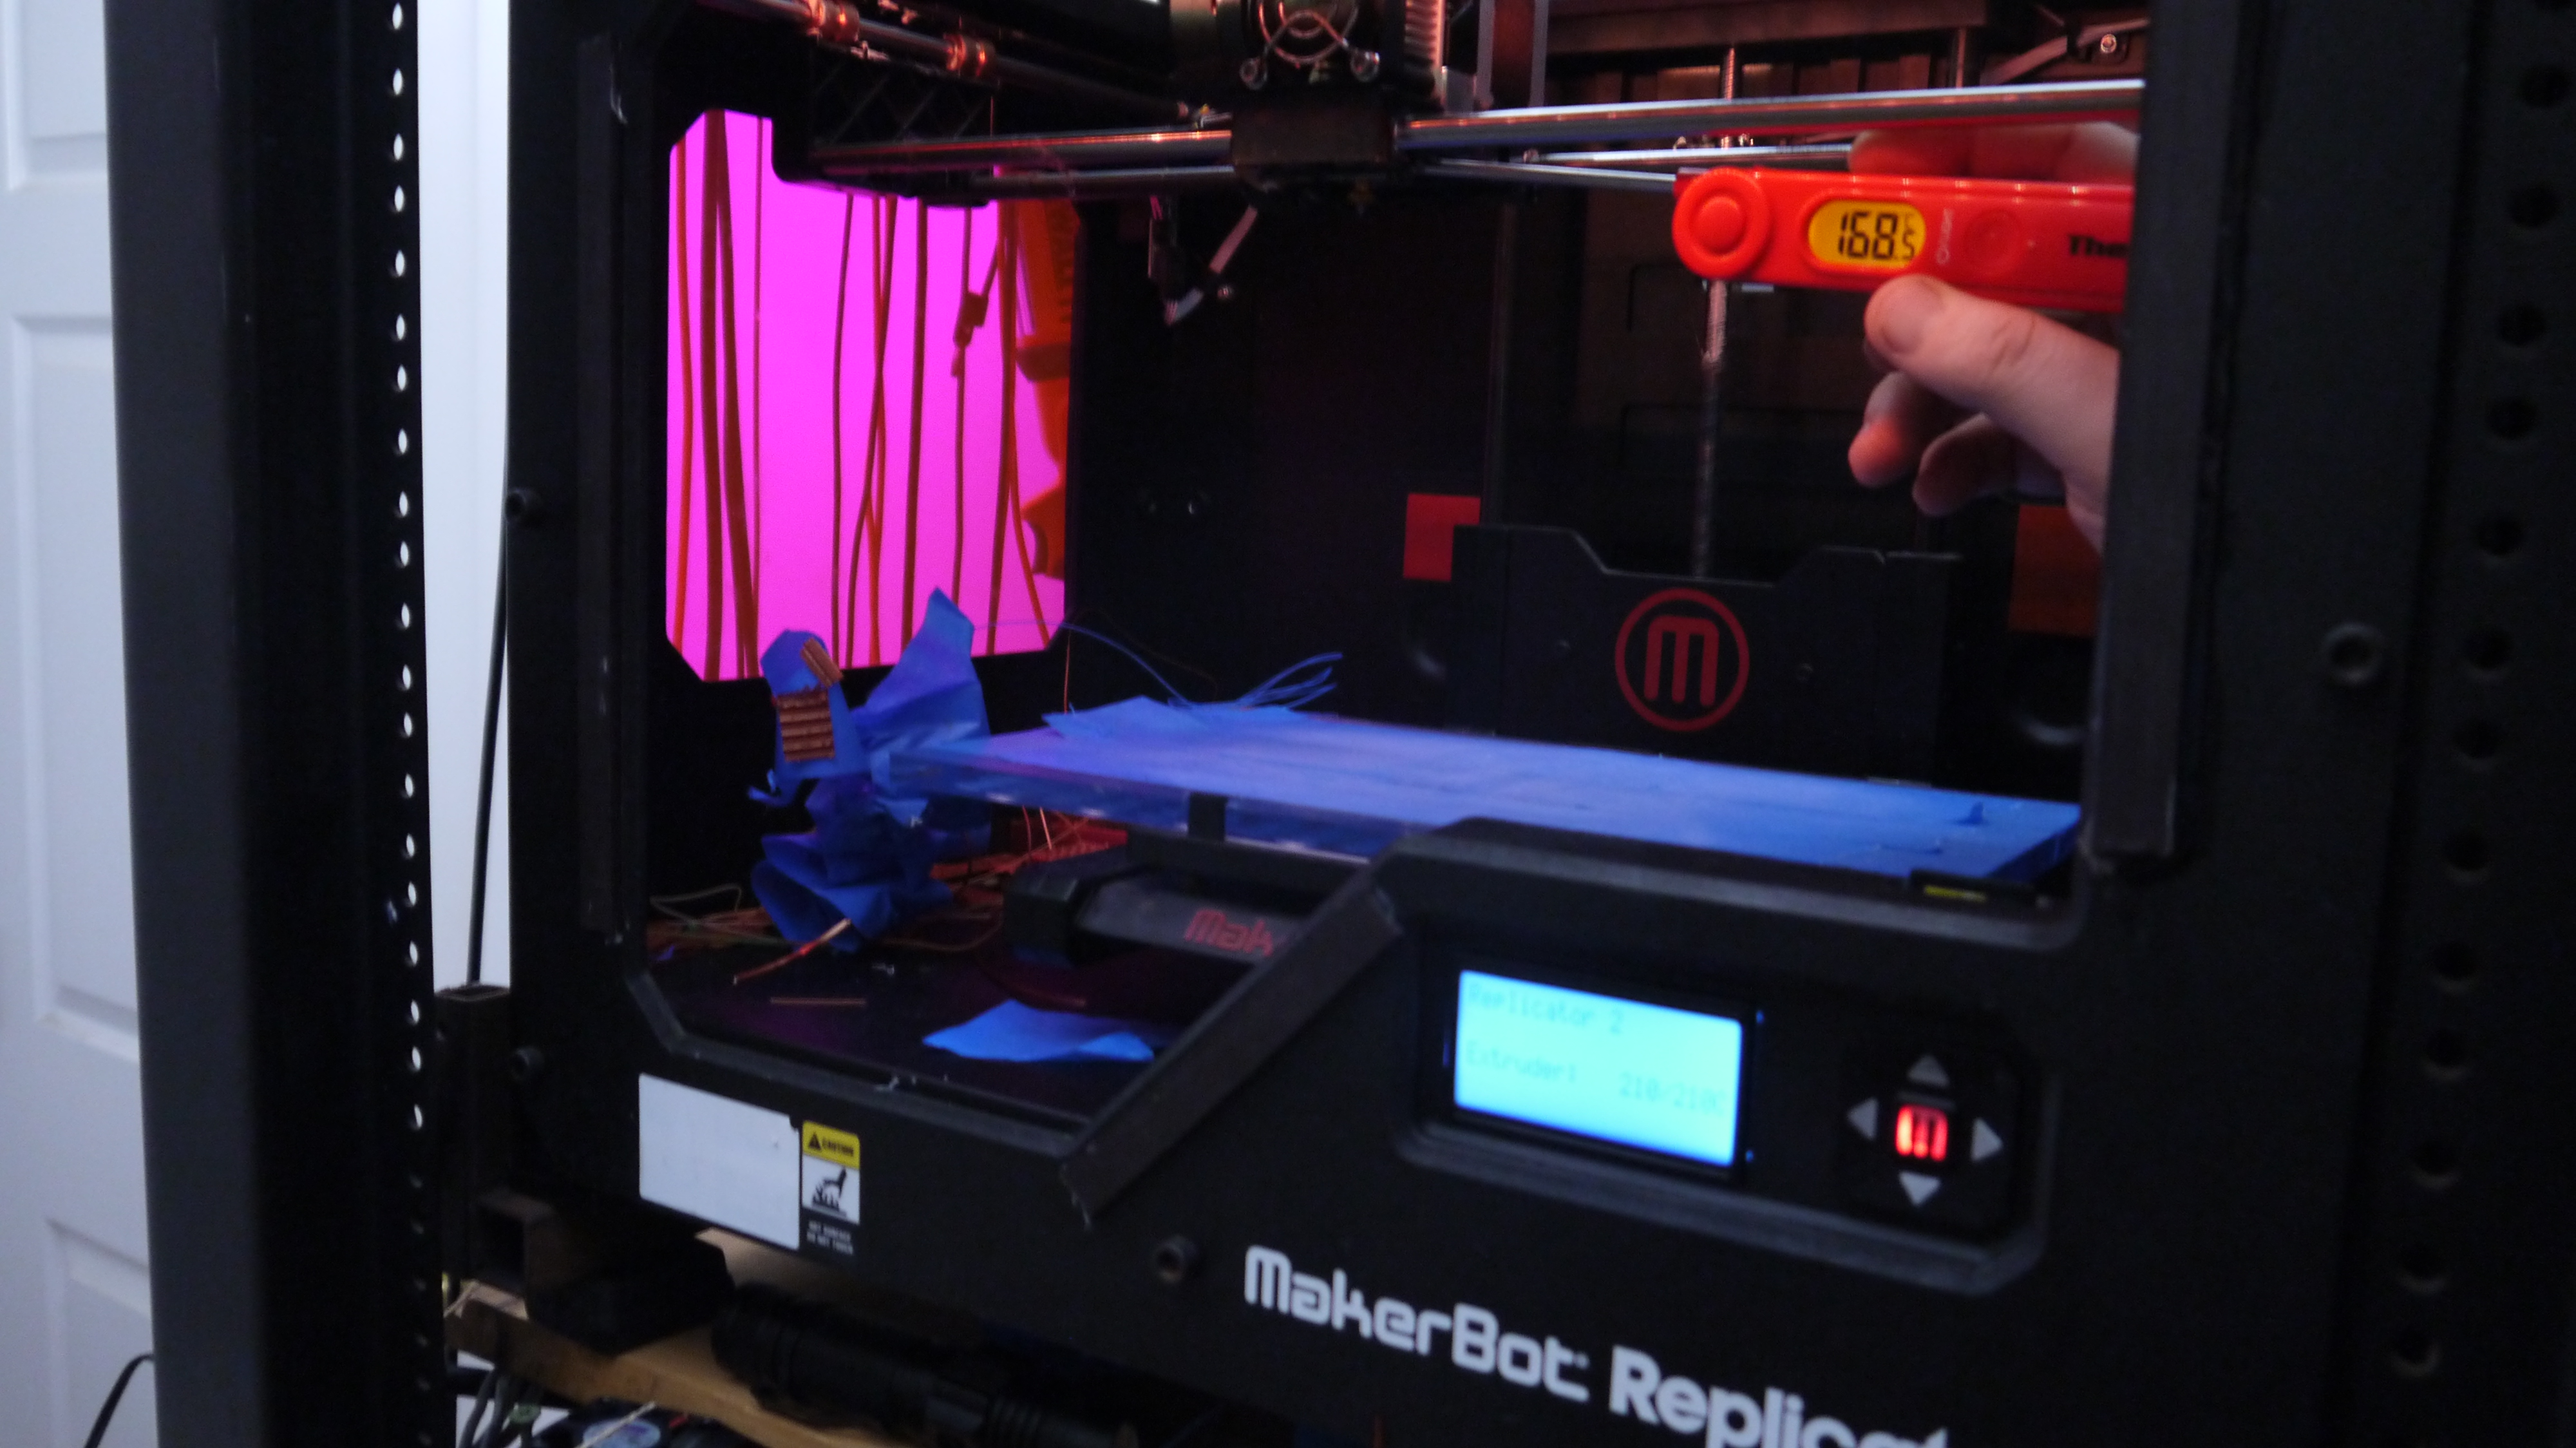 So the first test of the meat-thermometer and the makerbot reported temperature is really off. Shown in this poorly lit picture, a set-point of 210C and a read temperature of 168c. Whats properly bizarre is thermocouples shouldn't have offsets. Thermocouples topologically are just two wires of dissimilar metal welded together, they produce an offset voltage predictably with temperature. Its possible the thermocouple amp is failing? Unclear. As a result of this, an extrusion temperature of 200C now requires a print temperature of 240 C to compensate for this offset. Long term the actual issue should be resolved. |
|
| The Four
Tenets of 3Dprinting: Filament, Temperature, Adhesion
and Speed |
| Spark, Air, Fuel,
Compression are the four tenets of small engine repair. If
you have all four the engine should spin, it may not spin
stellarly but it will indeed function. We're going for
function first, so lets check each of these to make sure
we're not missing something basic: Filament, Temperature,
Adhesion and Speed. |
| Filament If you have a questionable gasoline powered lawnmower, remove variables and test it on new fuel, just as such use new filament when testing a questionable printer. PLA is hands-down the easiest printing experience, it is incredibly forgiving. Good PLA is also a good experience. |
| Temperature As mentioned earlier its not uncommon for temperature measurement to be incredibly off on surplus / for parts printers. You do not need elaborate test gear to verify extrusion temperature, you can get away with a simple digital meat thermometer for a first order approximation. Again PLA is fairly forgiving, having +/- 4C is not the end of the world. The easiest route to take here is to use the built in menu system. |
Adhesion Bed adhesion is somewhat a topic of contention, fortunately that arena has evolved so many times over the past few years that there are some great options. PLA on a glass heated bed is just so frigging good. I cant believe it took me so long to try this but it's great if you mostly print PLA. Glass has a fairly high coefficient of thermal expansion / contraction, which normally wouldn't be great but in this application is wonderful, you warm up the bed to 60C, print then let the bed cool down. While the bed is at 60C and clean of dust / oils, PLA adheres wonderfully, when the bed cools down to ambient the parts reliably dislodge. No chiseling with a screwdriver or messing about with bed misalignment every time you need to whack a part off the build surface. I'm going to assume the bed's are made of plate glass, with a coef. of expansion of 9 x10^-6 (m/moC) but just the linear expansion is shown as: dl = L0 α (t1 - t0)So on a 1ft (0.3m) square print surface: 0.3m * (9x10^-6)*(60C-20C) = 0.000108 meters, or 0.0108mm in either direction when the plate warms up / cools down. This is not huge but its enough for the part to 'pop off' when the base cools down. 60C is also not hot enough for the PLA to warp or mechanically change too much. For the makerbot replicator 2, there are some heated bed options, but the ones I inherited are non-heated so I'm opting for the fairly tried and true 'blue painters tape' approach. I've found that using a wire brush on the blue painters tape helps to add some surface area and increase its bonding. |
Speed Doubling your print speed does not halve your print time. This may seem counter-intuitive but the velocity set-point is still governed by the system's maximum acceleration. We can roughly confirm this with just 'simulation'. Take a simple model (a calibration cube) and get slicer time estimations for a variety of speeds, then plot. While slicer time estimation vs reality has its errors, we can take it for a reasonable approximation. This plot shows a lot of information, and somewhat curiously shows why most FDM 3d printers end up with a realistic max operating speed of 100mm/s. You simply run into decreasing marginal utility, somewhat bounded by machine acceleration, but more likely bounded by how much the extruder can extrude. Print at 100mm/s and it takes 40 minutes, print at 400mm/s and it takes... 24minutes, a lot of extra work for not a huge benefit. Plastic is also just a poor thermal conductor and the faster you attempt to print, the shorter the available time there is to warm up the filament. This plot assumes your extruder can keep up, but generally for extrusions > 120mm/s you're pushing it on a pinch-gear extruder. This is somewhat backed up by the default print speeds on popular printers:
|
| Step 1:
Trying some pre-made test prints |
| I made you some test prints that you can copy directly onto the SD card, no slicer no nothing, just put on an SD card and go. |
Actually
doubling speed does not halve print time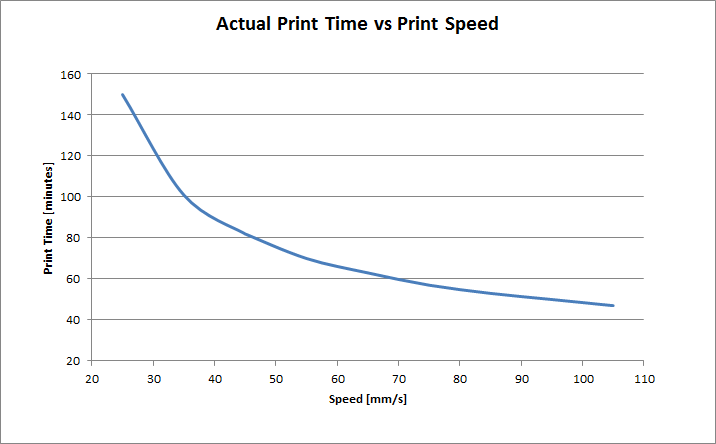 Its fairly easy to miss this one, but increasing your print speed does not linearly decrease print time. Here's a plot of data collected on the makerbot replicator printing fairly straightforward 35mm cube calibration cubes. You can see between 25 and 35mm/s there's actually a linear relationship, but after 35mm/s the selected velocity is bounded by the machine's maximum acceleration. As you increase print speed you also increase the extruder's back pressure, this is a potential cause for jamming. The makerbot extruder is not known for being all that great. It does work, but it has its limitations, if you can print slow you are literally trading time for likely hood of print completing successfully. |
| Step 2:
Slicing with CURA |
| Don't you dare use makerbot studio, it somehow does a fairly bad job at generating reasonable print paths and causes more headaches than it solves. |
Slicer
time is very enthusiastic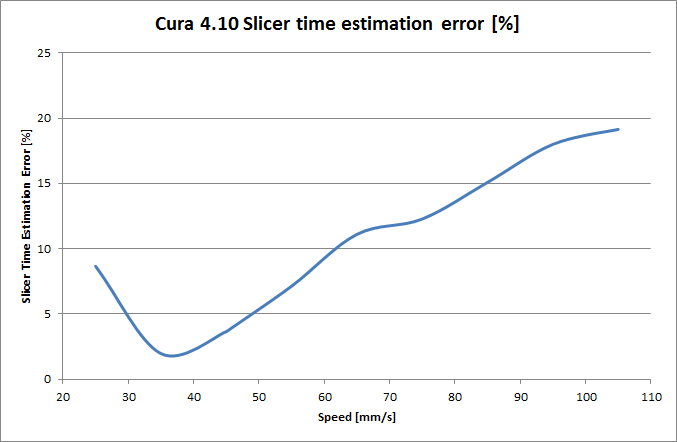 During the test prints I logged actual print time versus slicer estimated time, and like anything there's some deviation. Interesting the slicer is incredibly accurate at estimating print time at ~35mm/s printing. This however falls off pretty hard as we hit 100mm/s. Part of this could be due to a number of things, the acceleration that the machine |
| Low
Effort Upgrades |
A UPS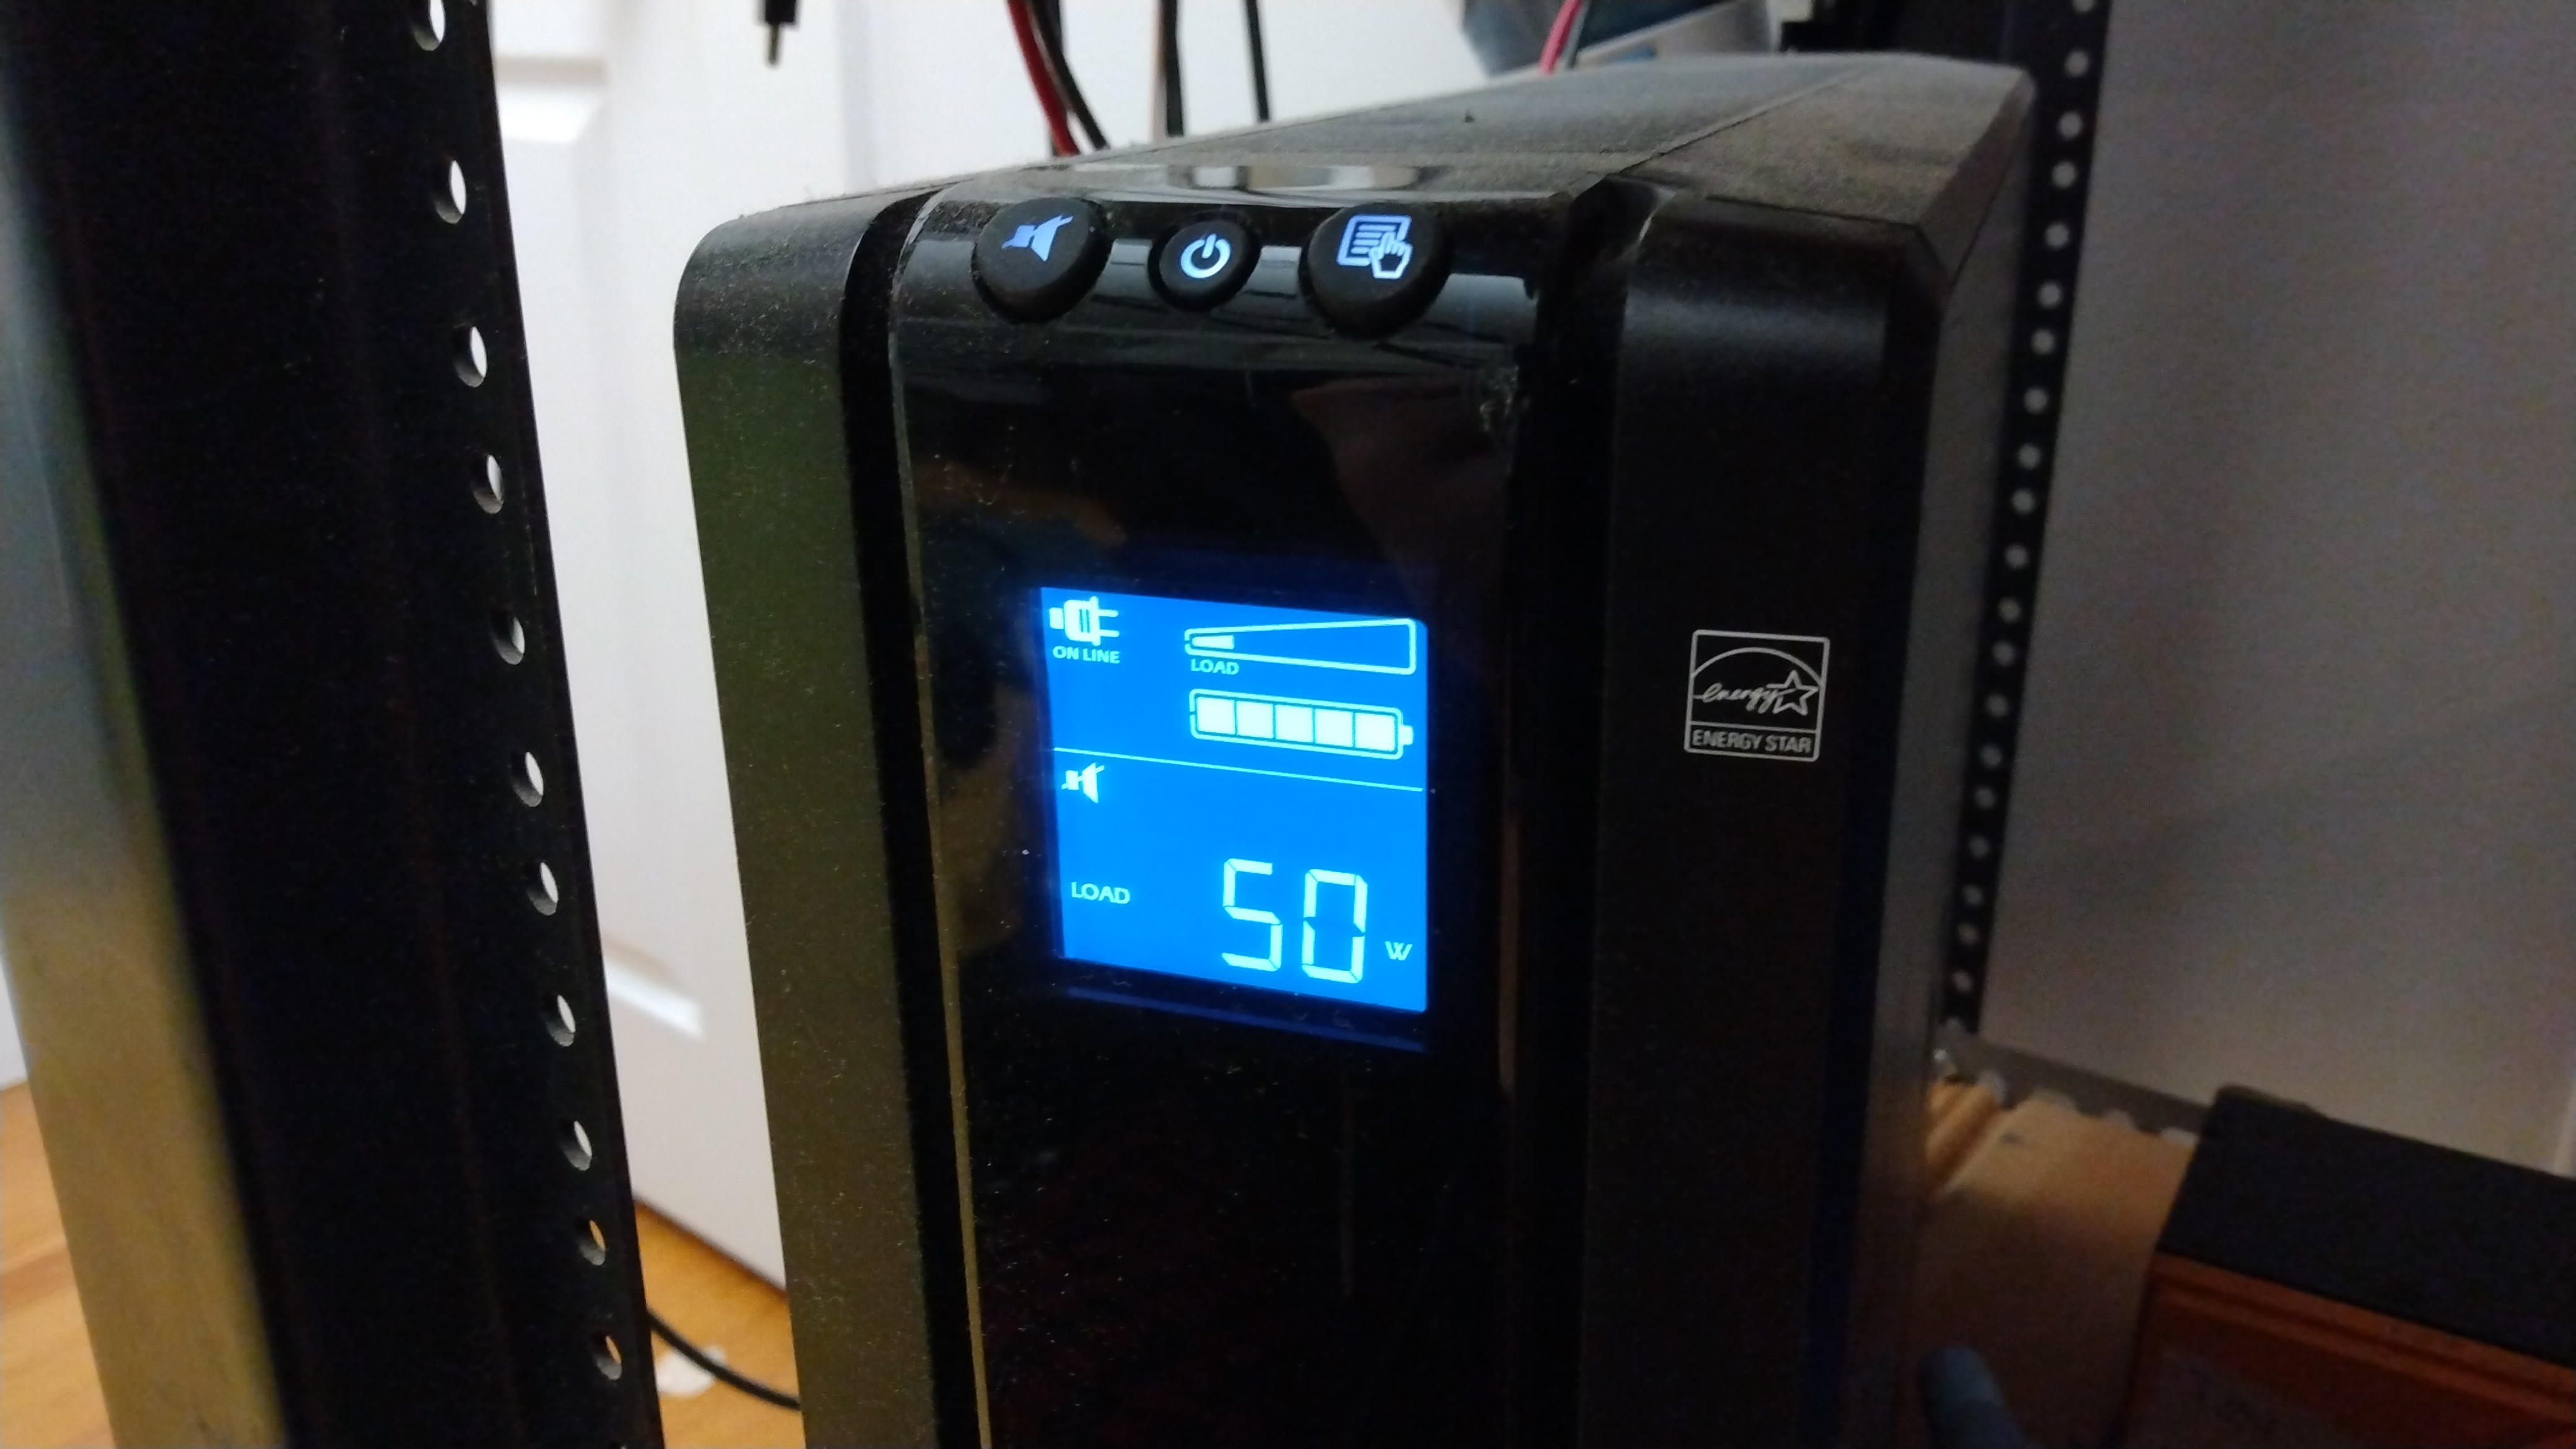 Now that things work, whats the low hanging fruit to get more reliable results? The makerbot uses a switch-mode supply generating 24v feeding everything on-board. That switch-mode supply can survive ~2 cycles of downtime before the printer starts to misbehave, as such you actually don't need a fancy UPS to keep things working. Almost all basic office UPS's are a dumb relay, they normally have mains connected directly from the wall to the output, on loss of mains (generally <90vac in the states) they wake up a very basic square-wave 60hz inverter and switch the relay to use that as the power source. I have a recycled APC XS 1500 that works in exactly this fashion. A UPS gets you out of the issue where your 9 hour print was affected by a momentary power blip as everyone turned on their stoves to go make thanksgiving dinner, etc. The peak power of a single extruded replicator 2 without a heated bed (the type I'm testing here) is 150W, so even the super basic single 12V7 battery style UPS can handle that. I haven't observed any issues using a dumb ups (square wave output) or modified sine wave output, you do not need a sinusoidal output ups. |
Did you notice the lack of advertisements or Facebook nonsense? Consider sending a cup of coffee :]
(There's other
photos in the photo gallery)
Concluding Remarks:If you have questions or comments, ask below or send over an email.
| Comments: |
|
HTML Comment Box
is loading comments...
|
Pack your homemade drone batteries safely, less they become inadvertent lithium hand-warmers.
Dane.Kouttron
Rensselaer Polytechnic
Institute
Electrical & Electrical
Power
631.978.1650